When winter’s chill arrives, it’s the perfect time to give our nails a seasonal makeover. Dip powder nails aren’t just trendy—they’re practical for those frosty months when we need a manicure that truly lasts through holiday parties and winter adventures.
We’ve gathered the most stunning winter dip nail ideas that’ll transform your fingertips into miniature works of art. From glistening snowflake designs and cozy sweater patterns to rich burgundies and icy blues that capture the essence of the season. These durable, chip-resistant manicures will keep you looking polished even when you’re bundled up in mittens and scarves.
10 Stunning Winter Dip Nail Ideas to Try This Season
1. Frosted French Tips
Frosted French tips create a gorgeous winter wonderland on your fingertips. This modern twist on the classic French manicure uses icy white or silver powder for the tips against a soft nude or pale pink base. Many nail artists recommend adding a touch of fine glitter to enhance the frosty effect. The subtle elegance makes these perfect for both office settings and holiday parties where you want to look polished but not overdone.
2. Deep Burgundy with Gold Flakes
Deep burgundy with gold flakes offers rich sophistication for winter festivities. This luxurious combination evokes the warmth of mulled wine and festive decorations. The opaque burgundy base provides a stunning canvas for scattered gold flakes, which catch the light beautifully. You’ll find this design particularly striking under indoor lighting during evening events, where the metallic accents create a subtle shimmer effect.
3. Sweater Weather Texture
Sweater weather texture designs bring cozy comfort right to your fingertips. This technique uses a special tool to create raised patterns that mimic cable knit textures in your dip powder. Soft gray, cream, or light blue powders work exceptionally well for this style. The dimensional quality of these nails makes them a conversation starter at winter gatherings, where everyone will want to touch your creative manicure.
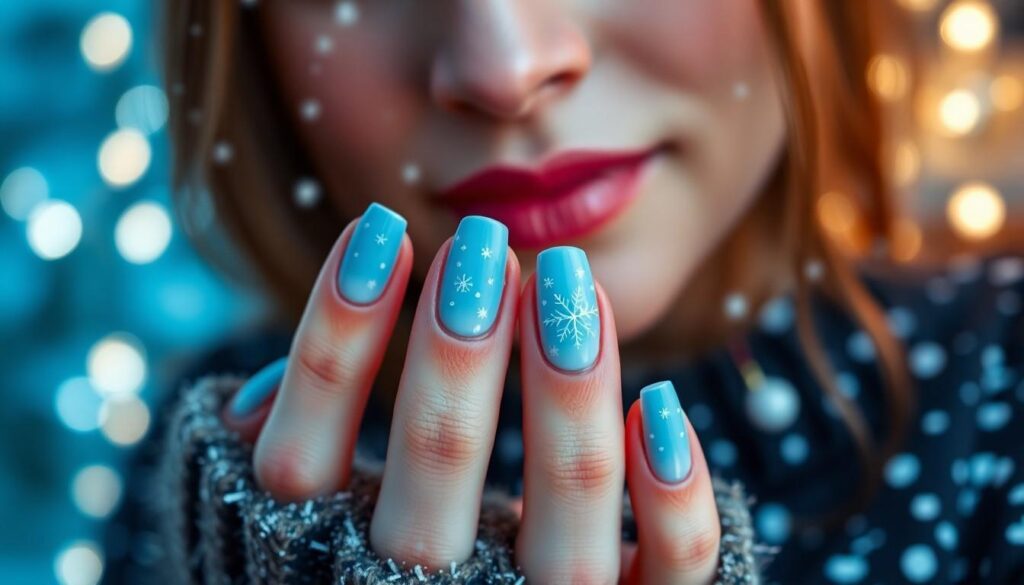
4. Icy Blue Ombré
Icy blue ombré nails capture winter’s crisp beauty with a gradient effect. Starting with a deeper blue at the base, the color transitions to a pale, almost white blue at the tips. Professional nail technicians often mix custom powder shades to achieve the perfect winter sky gradient. The smooth transition between shades creates an elegant, eye-catching look that pairs beautifully with both casual and formal winter wardrobes.
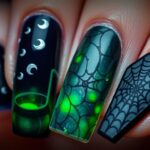
5. Matte Black with Crystal Accents
Matte black with crystal accents delivers dramatic winter elegance that stands out against snowy backgrounds. The flat, non-reflective black base creates a sophisticated canvas for strategically placed crystal embellishments that mimic ice formations. Clear crystals work best for a truly icy effect, though some prefer colored gems that match their winter wardrobe. This design balances edgy style with seasonal appropriateness.
6. Metallic Chrome Finish
Metallic chrome finish nails reflect winter’s brilliance with their mirror-like surface. Silver, gold, or rose gold powders are applied using special techniques to achieve that perfect reflective shine. The high-polish effect resembles ornaments and tinsel, making this style particularly festive for holiday celebrations. Chrome finishes require expert application but reward with dramatic, eye-catching nails that complement winter’s natural sparkle.
7. Snowflake Designs
Snowflake designs bring winter’s most iconic symbol to your manicure with delicate precision. White snowflake patterns against navy blue, deep purple, or black backgrounds create stunning contrast that celebrates the season. Nail artists use fine brushes or stamping tools to achieve intricate snowflake details that appear different on each nail. These designs work beautifully for December through February as they capture winter’s essence without being specifically holiday-themed.
8. Forest Green with Gold Accent Nails
Forest green with gold accent nails combines two quintessential winter colors for a majestic seasonal look. The deep emerald base evokes evergreen trees while metallic gold accents add festive warmth. Many people choose to make just one or two nails fully gold while keeping the others green for a balanced design. This color combination transitions perfectly from Christmas celebrations into the rest of winter.
9. Gradient Glitter Tips
Gradient glitter tips offer subtle sparkle that increases toward the nail ends. Starting with a neutral base like taupe or gray, silver or iridescent glitter concentration increases gradually toward the tips. This design mimics the sparkle of fresh snow while maintaining a sophisticated appearance. The graduated application technique ensures these nails remain appropriate for professional settings while still embracing winter’s magical quality.
10. Marble Effect with Silver Veining
Marble effect with silver veining creates an elevated, luxurious winter manicure inspired by ice formations. White or pale gray powder serves as the base, while silver lines create a realistic marble pattern throughout. Special techniques like water marbling or gel transfer methods achieve the most authentic stone-like appearance. These nails make a stunning complement to winter formal events where sophisticated elegance is appropriate.
Frosty Blue Ombre Dip Nails for a Winter Wonderland Look

Create a stunning winter-inspired manicure with frosty blue ombre dip nails that capture the essence of a serene winter industry. This eye-catching gradient effect transitions from light baby blue at the tips to deeper blue tones at the base, mimicking the beautiful hues of a winter sky.
How to Achieve the Perfect Blue Gradient Effect
Start by applying a quality base coat to prepare your nail surface for the dip powder application. Select multiple shades of blue powder, such as Revel Nail’s “Bonjour” light baby blue for your tips and a darker blue for the base. Apply your lightest blue shade to the nail tip area, gradually working your way to the darkest shade at the cuticle. Blend the colors where they meet using a small brush or sponge to create that smooth, seamless transition between shades. Layer your dip powder applications carefully, ensuring each layer is fully activated and dried before adding the next one. Buff the nails thoroughly after all layers are applied to smooth out any ridges or uneven areas, creating that flawless ombre finish. Seal your beautiful gradient with a clear top coat for maximum shine and durability.
Complementary Glitter Accents for Extra Sparkle
Elevate your frosty blue ombre dip nails with strategic glitter accents that enhance the winter wonderland theme. Silver or white glitter powders pair perfectly with blue tones, creating a magical, frosty effect that catches the light beautifully. Try Revel Nail’s “D167 Phoebe Silver Glitter” for accent nails or mix it with your blue shades for a glitter ombre variation. Add dimension to your manicure by incorporating nail art flakes, such as the luxurious gold flakes from Revel Nail’s “A Touch of Reflection” set. Create intricate winter details by using white gel liner to draw delicate snowflakes or geometric patterns over your ombre base. Finish your design with a clear gel top coat to seal in your artwork and add brilliant shine to your winter-inspired manicure.
Cozy Sweater Pattern Dip Nails for Holiday Gatherings

Transform your nails into miniature winter fashion statements with cozy sweater pattern dip nails that perfectly complement holiday festivities. These intricate designs capture the essence of your favorite winter knitwear, bringing warmth and style to your fingertips during the coldest season.
To create authentic sweater patterns, start with warm, earthy tones like browns, creams, and soft grays as your base colors. Alternating these shades in knit-like patterns mimics the texture of your favorite winter sweater. For added dimension, combine solid dip powders with subtle glitter varieties to create depth and visual interest that catches the light at holiday gatherings.
Detailed sweater nail art requires precision tools such as dotting implements and fine line brushes to create realistic knit patterns. Enhance your design with charming details like miniature faux buttons or tiny collars using nail art flakes or gel liners, transforming simple nails into conversation-starting accessories.
Creating Textured Cable Knit Designs
Textured cable knit designs elevate your winter manicure by adding three-dimensional elements that truly capture the cozy essence of winter knitwear. Layer different dip powders strategically to build a multi-dimensional look that resembles actual fabric. Begin with a solid base color, then use a dotting tool to apply small dots of contrasting powder in authentic cable knit patterns.
Mixing matte and shimmer dip powders creates realistic texture variations that replicate the natural sheen of yarn. Try applying a matte beige base with subtle champagne shimmer accents along the cable pattern to capture light exactly like a real sweater would.
Building genuine texture requires patience and technique. Apply multiple thin layers of dip powder, allowing each application to set completely before adding the next. This careful layering technique helps develop the raised texture that makes cable knit designs appear genuinely tactile and visually impressive.
Color Combinations That Evoke Warm Winter Feelings
Rich reds and deep berry shades paired with metallic silver or gold accents create luxurious winter manicures perfect for holiday celebrations. These classic combinations evoke the festive spirit while maintaining sophistication that works for both casual gatherings and formal events.
Soft pastels like light pink and baby blue, when combined with white or cream details, capture the delicate beauty of winter’s frost and snow. These subtle color stories create an elegant, understated winter wonderland on your nails without overwhelming your overall look.
Earthy tones including browns, taupes, and mossy greens deliver a grounded, cozy aesthetic that perfectly complements winter wardrobes. These versatile neutrals serve as excellent bases for your sweater pattern designs, while adding metallic or glitter accents introduces a festive dimension without sacrificing the comforting, cabin-inspired feel.
Snowflake accents incorporated into your sweater pattern designs add seasonal flair that enhances the winter theme. Using white or clear dip powder with silver or gold glitter creates delicate snowflake details that complement the cozy sweater patterns, merging two classic winter elements into one cohesive nail design.
Glittering Silver and White Dip Powder Combinations

Silver and white dip powder combinations create the perfect winter-inspired manicure that captures the essence of frosty landscapes and glistening snow. These elegant color pairings offer versatility while maintaining that seasonal sparkle we all crave during the colder months.
Creating the Perfect Silver and White Base
Start with a pristine white dip powder as your foundation, providing a clean canvas reminiscent of freshly fallen snow. Apply your base coat and dip into white powder, ensuring even coverage across the nail. For dimension, add a layer of silver glitter dip powder after applying another base liquid. The contrast between the pure white and shimmering silver creates a stunning winter effect that draws attention to your hands.
Try the ombre technique by dipping just the tips of your nails into silver glitter powder and using a brush to blend upward. This creates a beautiful gradient effect that mimics the transition from snow to ice crystals. Roughen the white base slightly before adding the silver layer to enhance adhesion and create a more seamless blend between the two colors.
Techniques for Achieving Maximum Shimmer
Preparation is key for maximum shimmer in your winter dip manicure. Use a coarse file to lightly roughen the surface of your base dip powder before applying any additional glitter layers. This creates tiny texture points that help the glitter adhere more effectively and distribute evenly across the nail.
Apply a high-quality gel top coat after completing your dip powder application to seal in the glitter and enhance the shine. This crucial step not only protects your design but also intensifies the sparkle effect, making your nails appear like they’re catching the winter sunlight.
For truly dazzling results, try the double dip technique. Apply multiple layers of glitter dip powder, allowing each layer to set before adding the next. This strategic layering builds up a dense concentration of glitter particles, creating exceptional dimension and maximum shine that resembles ice crystals catching the light.
Snowflake Accents to Complete Your Winter Look
Transform your glittering silver and white base into a winter wonderland by adding delicate snowflake accents. Start with your completed dip powder base, then use a white gel liner to draw snowflake patterns. Create a central line first, followed by smaller lines at 45-degree angles to form the classic snowflake shape.
Use a precision dotting tool to add small white dots between the lines of your snowflakes, creating more intricate and realistic designs. The fine details make each snowflake unique, just like in nature. For additional dimension, place tiny dots at the ends of each line to create the appearance of crystallized tips.
Enhance your snowflake designs by incorporating complementary elements. Add tiny red dots at the center of snowflakes for a pop of contrast, or create a French tip effect with a different colored gel polish that frames your snowflake art. These thoughtful details transform a simple manicure into a seasonal masterpiece that celebrates winter’s natural beauty.
Deep Burgundy and Gold Dip Nails for Elegant Winter Events

Deep burgundy paired with gold accents creates one of the most sophisticated nail designs for winter 2025. This luxurious combination offers the perfect balance of rich color and festive flair, making it ideal for holiday parties and elegant winter gatherings.
Layering Methods for Rich Color Depth
Creating that perfect deep burgundy requires strategic layering techniques for maximum dimension and depth. Start with a quality base coat to ensure proper adhesion before applying your first layer of burgundy dip powder. Multiple thin layers work better than one thick application, allowing you to build the color gradually for a more uniform finish. Dip your nail at a 45-degree angle to prevent air bubbles and ensure even coverage across the entire nail surface. Between each layer, brush off excess powder for a smooth result that showcases the true richness of the burgundy shade. For added dimension, try layering different shades of red and burgundy dip powders – perhaps starting with a lighter berry tone and finishing with a deeper wine color to create a subtle depth that catches the light beautifully.
Adding Metallic Accents for Festive Flair
Gold accents transform burgundy nails from simply elegant to festively glamorous for winter events. Apply gold dip powder to exact nails for an accent effect, creating an intentional contrast against the deep burgundy base. Alternatively, dust gold flakes over wet top coat for a more organic, scattered sparkle that mimics falling snowflakes with a luxurious twist. Creative designs like gold French tips or half-moon details at the nail base offer sophisticated options for incorporating metallic elements. For a more subtle approach, try adding thin gold stripes or small dots using a fine striper brush – this technique works beautifully for those who prefer understated elegance. Gradient effects blending burgundy into gold create a stunning transition that catches the light as you move your hands, drawing attention in the most flattering way possible. These metallic accents not only complement the rich burgundy base but also tie in perfectly with winter’s festive atmosphere and holiday celebrations.
Evergreen Forest-Inspired Dip Nail Designs

Transform your winter manicure into a lush woodland escape with evergreen forest-inspired dip nail designs. These nature-themed creations capture the serene beauty of winter forests while providing a sophisticated seasonal look.
Creating Dimension with Multiple Green Shades
Evergreen forest nail designs truly come alive when you incorporate multiple green shades for realistic dimension. Start with a dark hunter green as your base color to establish depth and forest density. Layer lighter moss or sage green shades strategically to create natural variation similar to sunlight filtering through pine branches. Ombre effects work beautifully for this style, allowing you to gradate from dark to light green in a single nail for a multidimensional forest effect.
Adding a touch of neutral beige or cream creates the impression of snow-dusted trees, perfect for winter designs. Try applying a clear dip powder with green glitter as a top layer to mimic the sparkle of frost on evergreen needles. The layering technique is particularly effective with dip powders, as you can build intensity where needed while maintaining a smooth finish that lasts throughout the holiday season.
Pine Tree and Holly Accent Nail Techniques
Accent nails featuring detailed pine trees and holly bring your forest-inspired manicure to life. Create miniature pine tree silhouettes using a fine line brush and dark green dip powder on one or two feature nails. Add white or light gray powder at the tips of your trees to mimic snow-covered branches for an authentic winter forest look.
Holly accents offer another festive option that complements the evergreen theme perfectly. Apply green dip powder in leaf shapes using a detail brush, then add small red dots for berries using a dotting tool and red gel polish. Products like Revel Nail’s D333 Ice (a clear powder with subtle gold flakes) can create a beautiful frosty effect around your forest elements.
For added elegance, incorporate metallic accents in silver or gold to represent winter’s brilliant light reflecting off snow-covered branches. These precise nail art techniques require patience but deliver stunning results that capture the quiet beauty of winter forests. Small details like varied tree heights and clustering holly berries in groups of three make your nail design appear more natural and professionally executed.
Metallic Chrome Winter Dip Nail Ideas

Winter calls for dazzling nail designs that capture the season’s icy brilliance, and metallic chrome dip nails perfectly embody this frosty aesthetic. Chrome finishes create a stunning reflective surface that mimics winter’s glistening ice and snow, making them ideal for holiday parties and seasonal celebrations.
Mirror Finish Techniques Using Dip Powder
Achieving a flawless mirror finish with dip powder requires proper technique and the right products. Start by ensuring your dip powder application is perfectly smooth and even, as any bumps will be magnified in a reflective finish. After applying your preferred dip powder layers, thoroughly activate and buff the nails to eliminate excess powder and create an ultra-smooth surface. The key to a true mirror finish lies in the final step—applying a UV Gel Top Coat that seals and dramatically enhances the shine factor.
High-shine top coats play a crucial role in creating that eye-catching mirror effect. Some specialized dip powder sets, such as those from Revel Nail, include exact instructions for achieving a chrome mirror finish by combining their powders with a UV Gel Top Coat. For a stunning winter-appropriate metallic base, try using dip powders like D167 Phoebe Silver Glitter, which provides a silver foundation filled with fine silver glitters that catch the light beautifully.
Combining Chrome with Matte Finishes for Contrast
Creating visual interest in your winter manicure becomes effortless when you pair chrome and matte finishes together. This striking contrast adds dimension and sophistication to your nail design, making it perfect for winter’s dramatic aesthetic. Try applying chrome dip powder on some nails while giving others a matte treatment for an eye-catching alternating pattern.
The process for achieving this dual-texture look is straightforward yet effective. First, complete your chrome nails using the mirror finish technique. For matte nails, apply a regular clear top coat over your dip powder, allow it to dry completely, then follow with a matte top coat that transforms the glossy surface into a sophisticated velvet-like finish. Adventurous nail enthusiasts might even create geometric designs on individual nails, where some sections feature chrome brilliance while others showcase matte elegance.
For truly festive winter nails, incorporate seasonal elements alongside your chrome and matte contrast. Snowflake designs added with white gel liner provide a distinctly winter touch that enhances the overall theme. Also, mixing different textures such as glitter and chrome can create exceptional depth in your design—try pairing a glitter dip powder like D48 Margo Pink Glitter with chrome sections for a manicure that captures winter’s magical sparkle.
Snowy French Tip Dip Nail Variations

Modern Twists on the Classic French Manicure
Traditional French manicures get a winter upgrade with frosty dip powder combinations that elevate your nail game. Try using light baby blue like Revel Nail’s “Bonjour” as your base and apply a white shimmer accent like “Wonderland” for the tips to create a snowy effect. Frosty blues and pale pinks with shimmer finishes offer a refreshing alternative to standard white tips, giving your French manicure a seasonal makeover. Margo Pink Glitter Dip Powder by Revel Nail provides a sheer light pink base with silver shimmer that’s perfect for winter festivities. Add intricate snowflake designs using a white gel liner and a small dotting tool to transform your French tips into miniature winter scenes. Gold flakes or fine silver glitters can be incorporated to modernize this classic style, with combinations like “D333 Ice” dip powder paired with “A Touch of Reflection” gold flakes creating an eye-catching contrast.
Incorporating Shimmery Winter Elements
Shimmery dip powders instantly transform your manicure into a winter wonderland that captures the season’s magic. D167 Phoebe Silver Glitter Dip Powder offers a stunning silver base filled with fine silver glitters, making it ideal for snowy nail designs. Apply shimmers as chrome powders with a UV Gel Top Coat to achieve an intense sparkle and high-gloss finish that mimics icicles catching sunlight. Creative color combinations multiply your options, with pairings like “D481 Imagine,” “D20 Erica,” and “D77 Bubbly” working together to create multidimensional winter looks. Experiment with layering different shimmery powders to create depth and dimension that resembles a snow-covered industry. Focus on application techniques that maximize sparkle potential, including proper powder distribution and strategic placement of accent shimmers on exact nails.
Hot Cocoa-Inspired Brown and Cream Dip Nails

Nothing feels more winter-appropriate than nail designs inspired by everyone’s favorite cold-weather beverage—hot cocoa! These warm, rich designs combine deep chocolate browns with creamy accents to recreate that comforting cup of cocoa right on your fingertips.
Creating Marbled Effects for a Swirled Look
Marbled dip nails capture the swirling, mesmerizing effect of cream being stirred into hot chocolate. Start with a base layer of deep brown dip powder, resembling the rich cocoa base of your favorite winter drink. Apply multiple thin layers of different shades, including chocolate brown and creamy beige powders for authentic dimension. Use a thin nail art tool or brush to gently swirl the colors together before they set completely, creating a beautiful, fluid pattern. This technique works perfectly for creating a frosty, icy appearance that mimics the swirling textures of hot cocoa. Seal your creation with a quality top coat to preserve the intricate marbled design and add remarkable shine that enhances the overall effect.
Adding “Marshmallow” White Accents
White accents serve as the perfect “marshmallow” topping for your hot cocoa-inspired manicure. Apply white shimmer dip powder, such as Revel Nail’s D386 Wonderland, to the tips or as an accent nail to create that fluffy marshmallow effect. Create small rounded shapes at the tips of nails to mimic floating marshmallows, or apply the white shimmer as a gradient that fades into your brown base for a melting effect. Dot small amounts of white powder strategically on darker bases to represent mini marshmallows floating atop your cocoa. These winter wonderland touches transform ordinary brown nails into a seasonal masterpiece that perfectly captures the cozy essence of winter gatherings. For added dimension, layer clear dip powder over the white accents to create a realistic, three-dimensional marshmallow appearance.
Icy Crystal Clear Dip Nails with Embedded Designs

Transform your winter manicure with crystal clear dip nails that showcase stunning embedded designs. These transparent creations offer a sophisticated canvas for seasonal nail art while maintaining the durability that dip powder is known for.
Techniques for Transparent Dip Powder Application
Achieving flawless transparent dip nails requires precise application techniques for that perfect icy finish. Start by applying a quality base coat to ensure proper adhesion of your clear dip powder. Apply your clear powder in thin, even layers, allowing each application to set completely before adding the next to prevent thickness and cloudiness. Buffing is essential after your dip powder application to create a smooth surface for any additional art elements. Use a white gel liner with fine nail art brushes to add intricate designs on top of your clear base, creating dimension without compromising transparency. Finish with a high-quality top coat to seal your design and enhance the crystal-clear appearance that makes these nails truly stand out.
Winter Motifs That Work Well in Clear Designs
Snowflake patterns serve as the quintessential winter design element, perfectly complementing transparent dip powder bases with their delicate appearance. Create these intricate designs using a white gel liner and a fine line brush against your clear backdrop for a frosty effect that mimics ice crystals. Silver and gold glitter accents add festive dimension to transparent nails, with products like “D167 Phoebe Silver Glitter” providing that perfect sparkling effect against the clear canvas. Incorporate traditional holiday colors such as red, green, and gold strategically within your transparent design for seasonal flair without overwhelming the crystal-clear aesthetic. Frosted blues and whites, particularly light baby blue shades like Revel Nail’s “Bonjour,” pair beautifully with clear dip powder to create an ethereal winter industry on your fingertips. Gold flakes embedded in clear dip powder, such as those found in the “A Touch of Reflection” Nail Art Flakes set, create a sophisticated holiday look that appears suspended in ice, perfect for winter celebrations and elegant events.
Essential Tips for Long-Lasting Winter Dip Nails
Winter dip nails offer endless possibilities for expressing your seasonal style. From frosty blues and deep burgundies to cozy sweater patterns and glistening metallics we’ve explored stunning options to elevate your winter manicure game.
Remember that proper preparation and quality products are key to achieving these eye-catching designs. Whether you’re attending holiday gatherings or battling the winter chill dip powder nails provide the durability and visual impact you need.
We hope these creative ideas inspire you to experiment with seasonal colors patterns and textures. With the right techniques and a touch of imagination your nails can become the perfect winter accessory that celebrates the magic of the season while keeping your hands looking fabulous.
Frequently Asked Questions
Are dip powder nails good for winter?
Yes, dip powder nails are excellent for winter. They provide superior durability that withstands harsh winter conditions and frequent hand washing. The powder application creates a stronger bond than regular polish, preventing chips and cracks even when wearing gloves or participating in winter activities. Additionally, they maintain their shine throughout the season without fading, making them perfect for holiday events and everyday winter wear.
How long do winter dip nails last?
Winter dip nails typically last 3-4 weeks without chipping or fading, significantly outlasting regular polish. The durable formula creates a strong protective layer that withstands harsh winter conditions, frequent hand washing, and holiday activities. With proper application and care, many people enjoy chip-free manicures through the entire holiday season, making dip powder an economical choice for winter nail maintenance.
What are the most popular winter dip nail colors?
The most popular winter dip nail colors include deep burgundy, forest green, navy blue, and icy metallics like silver and gold. Rich jewel tones dominate the season, while cool-toned neutrals like taupe and greige offer understated elegance. Frosty whites and pale blues reminiscent of snow and ice are winter staples, and shimmery finishes that catch the light are particularly popular for holiday celebrations and winter events.
How do I create ombré effects with dip powder?
To create an ombré effect with dip powder, start by applying your lighter shade to the entire nail. Then apply the darker shade to just the tips, gradually blending it upward. Use a brush to gently sweep away excess powder at the transition point. Repeat the process, building layers until you achieve your desired gradient. Finish with a clear dip powder over the entire nail for a smooth, seamless blend.
What’s the best way to add snowflake designs to dip nails?
The best way to add snowflake designs to dip nails is to first complete your base dip powder application and top coat. Once cured, use a fine detail brush with white gel polish or a white nail art pen to draw snowflakes. For precision, try dotting tools to create perfect symmetrical patterns. Alternatively, apply tiny rhinestones or use snowflake nail stickers for dimension. Seal with a clear top coat to protect your design.
Can I do sweater pattern dip nails at home?
Yes, you can create sweater pattern dip nails at home with practice. After applying your base dip powder color, use a thin brush and gel polish to draw cable knit patterns or sweater textures. For easy application, try using stamping plates with sweater patterns or textured powders that create a 3D effect. Add dimension with matte top coat for an authentic fabric look. Complete beginners might start with simple accent nails before attempting full sets.
How do I maintain my dip powder nails during winter?
Maintain winter dip powder nails by applying cuticle oil daily to combat dryness. Wear gloves when doing dishes, cleaning, or heading outdoors in cold weather. Avoid using your nails as tools to prevent cracks. Apply a clear top coat every 7-10 days to refresh shine and strengthen the protective layer. Moisturize hands frequently with rich hand cream to prevent the surrounding skin from becoming dry and flaky.
What’s the difference between glitter and chrome dip powders?
Glitter dip powders contain reflective particles suspended in the powder, creating a sparkly, textured finish with dimension. Chrome dip powders use ultra-fine metallic pigments that, when buffed, create a smooth, mirror-like reflective surface with a uniform shine. Glitter powders offer more texture and can be layered for varying intensity, while chrome powders provide a sleek, futuristic appearance. Both are popular winter choices but create distinctly different visual effects.
Are dark colors like burgundy harder to apply with dip powder?
Dark colors like burgundy aren’t necessarily harder to apply, but they do require attention to detail. They show imperfections more readily and may need additional layers for full opacity. To achieve flawless results, apply thin, even coats and brush away excess powder carefully. Use a good quality dip powder system with pigmented formulas, and take extra care during shaping and buffing to avoid revealing the nail underneath.
How do I incorporate metallic accents into winter dip nails?
Incorporate metallic accents by applying gold or silver dip powder as French tips over a solid color base. Create geometric designs using thin strips of metallic powder. Try the reverse French technique with metallic curves at the nail bed instead of tips. For subtle accents, dust metallic powder lightly over specific areas using a small brush. Add dimension by embedding metallic foil between layers of clear dip powder for a sophisticated winter look.