Ready to add some serious sparkle to your manicure? We’re obsessed with rhinestone nail designs that transform ordinary nails into dazzling works of art. These tiny gems can elevate any nail look from simple to simply stunning with minimal effort.
10 Glamorous Rhinestone Nail Ideas to Elevate Your Manicure
1. French Tip Rhinestone Accent
The classic French manicure gets a dazzling upgrade with strategically placed rhinestones along the tips. We recommend applying tiny clear or silver rhinestones along the smile line of your French tips for an elegant yet eye-catching effect. This design works beautifully for special occasions or when you want to add a touch of sophistication to your everyday look.
2. Ombré Rhinestone Cascade
Create a stunning gradient effect by placing rhinestones in a cascading pattern from the cuticle to the tip. Start with densely packed stones near the cuticle and gradually space them out toward the tip for a waterfall-like appearance. This technique looks especially striking on a neutral base like nude or pale pink, allowing the rhinestones to truly shine.
3. Rhinestone Border Design
Frame your nails with a border of sparkling rhinestones for an instantly glamorous look. Apply a single row of stones along the edges of your nails, creating a frame effect that draws attention to your manicure. This design can be adapted to any nail shape and looks particularly impressive on almond or coffin-shaped nails.
4. Negative Space with Rhinestone Accents
Incorporate the trendy negative space technique by leaving portions of your nail bare and decorating strategic areas with rhinestones. Place stones along geometric patterns or curved lines for a modern, artistic approach. This minimalist design offers a perfect balance of elegance and contemporary style.
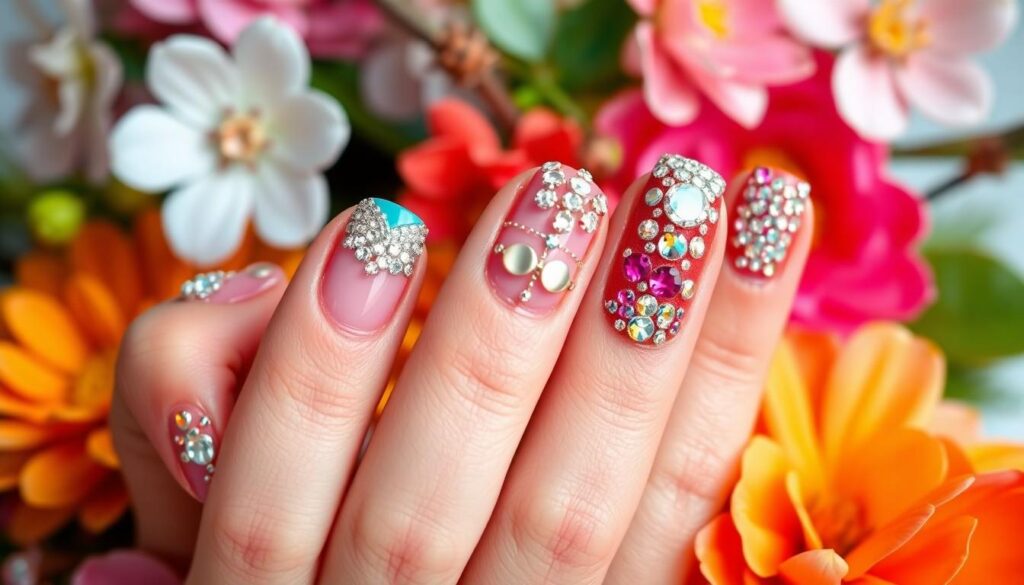
5. Full Rhinestone Encrusted Accent Nail
Transform one or two accent nails into dazzling focal points by completely covering them with rhinestones. Select your ring finger or pinky for this statement look while keeping the rest of your nails in complementary solid colors. For maximum impact, arrange stones in a uniform pattern, ensuring complete coverage from cuticle to tip.
6. Rhinestone Constellation Pattern
Draw inspiration from the night sky by creating celestial patterns with rhinestones on a dark base. Arrange stones in recognizable constellation shapes or create abstract star-like clusters across your nails. A deep navy, black, or purple base will enhance the twinkling effect of the rhinestones, mimicking stars against the night sky.
7. 3D Rhinestone Flower Designs
Create dimensional floral designs using rhinestones as the focal elements of your flowers. Position larger stones in the center surrounded by smaller ones to create petal-like arrangements. This three-dimensional design adds texture and visual interest to your manicure, perfect for spring and summer occasions.
8. Rhinestone and Metallic Combination
Pair rhinestones with metallic polish or foil accents for an ultra-luxurious manicure. Apply metallic stripes or geometric shapes as the base design, then place rhinestones at intersection points or along the metallic lines. This combination creates a multi-dimensional effect that catches the light from every angle.
9. Gradient Rhinestone Placement
Arrange rhinestones in various sizes from smallest to largest across your nail for a graduated effect. Start with micro-stones near the cuticle and progress to larger ones toward the tip, creating visual movement and dimension. This technique works beautifully on long nails where the gradient can be fully appreciated.
10. Rhinestone Embedded Tips
Incorporate rhinestones into clear tips for a modern take on the classic French manicure. Apply a layer of clear builder gel at the tips, then embed rhinestones before curing. This technique securely encases the stones within the structure of the nail extension, creating a durable and eye-catching design that won’t snag on clothing.
Elegant French Tips with Rhinestone Accents

French tips have always been a timeless nail design, but adding rhinestones elevates this classic look to new levels of sophistication. These glamorous accents can transform your traditional French manicure into a statement-worthy style while maintaining its inherent elegance.
Classic French Manicure with Rhinestone Borders
The classic French manicure gets a dazzling upgrade when you add a sparkling border of rhinestones along the tip. For this eye-catching design, carefully place small rhinestones along the curve where the white tip meets your natural nail color. You’ll need nail glue or a special rhinestone applicator to secure each gem precisely along the border. This stunning combination maintains the timeless elegance of French tips while incorporating just enough sparkle to catch everyone’s attention. Try using various sizes of rhinestones for added dimension or stick with uniform gems for a more refined look.
Curved Rhinestone Lines on French Tips
Curved rhinestone lines create a modern twist on the traditional French manicure by following the natural shape of your nail tip. Apply a single row of rhinestones that traces the curved line of your French tip for a subtle enhancement. Alternatively, create multiple curved rows for a more dramatic and luxurious effect that still honors the classic design. The strategic placement of these curved lines draws attention to the tips of your nails while adding movement and dimension. For best results, use a neutral base color before applying the rhinestones to keep the focus on your sparkling curved design. This technique works wonderfully for special occasions but remains sophisticated enough for everyday wear when implemented with restraint.
Dazzling Full Rhinestone Coverage Designs

Full rhinestone coverage transforms ordinary nails into spectacular, light-catching masterpieces perfect for making a statement. This versatile technique involves applying many small rhinestones to cover the entire nail surface, creating a luxurious, textured appearance that catches the light from every angle. You can customize this dazzling look with different colors and shapes of rhinestones—opt for a single color for elegant uniformity or mix various hues for vibrant dimension. These eye-catching designs are particularly popular for special occasions like weddings, milestone birthdays, and holiday celebrations where a touch of glamour is essential.
Ombré Rhinestone Gradient Nails
Ombré rhinestone gradient nails combine two stunning techniques to create a mesmerizing visual effect that’s both sophisticated and playful. The design starts with a beautiful color transition on the nail—typically flowing from one shade to another—then enhances this gradient with strategically placed rhinestones. You can arrange the gems randomly for a scattered starlight effect or follow the color pattern to intensify the gradient appearance. Try pairing pink and blue ombré bases with iridescent rhinestones to create an enchanting shifting color effect as your hands move. This style works beautifully for spring and summer events or anytime you want to add dimension and visual interest to your manicure.
3D Rhinestone Cluster Statement Nails
Statement nails featuring 3D rhinestone clusters create bold, textured focal points in your manicure that demand attention. This technique involves grouping rhinestones of various sizes to create raised, dimensional designs with important visual impact. Achieve this striking look by combining small and larger rhinestones or incorporating rhinestone studs to build height and texture. Creative options include heart-shaped clusters, butterfly designs, or seasonal motifs like snowflakes or flowers. Secure your 3D creations with specialized nail glue rather than regular top coat to ensure longevity and prevent gems from dislodging. Using precision tweezers helps place each stone exactly where you want it, allowing for intricate patterns and professional-looking results even for at-home manicures.
Minimalist Rhinestone Nail Art for Everyday Elegance

Not everyone wants flashy, over-the-top nail designs. Minimalist rhinestone nail art offers the perfect balance of elegance and simplicity for those who prefer understated beauty with just a touch of sparkle.
Single Rhinestone Accent Nails
Single rhinestone accent nails create a subtle yet sophisticated look that’s perfect for everyday wear. Placing just one strategically positioned gemstone on each nail draws attention without overwhelming your overall style. You can position this solitary rhinestone at the center of your nail for classic elegance, near the cuticle for a modern twist, or at the tip for a delicate finish. This approach works beautifully on bare nails for a natural look or over neutral polish for added refinement. The simplicity of this design makes it appropriate for professional settings while still allowing for personal expression through your choice of rhinestone color and placement.
Delicate Rhinestone Dotting Patterns
Rhinestone dotting patterns offer versatility while maintaining minimalist appeal. Creating fine lines of tiny rhinestones along your nail bed produces a delicate, elegant effect that catches light with every movement. You can arrange these gemstones in geometric patterns, straight lines, or scattered randomly across the nail for a whimsical, stars-in-the-sky appearance. These dotting patterns pair wonderfully with other design elements like small painted flowers or butterflies to add dimension without becoming excessive. Many nail enthusiasts appreciate how these patterns allow for creativity while remaining sophisticated enough for both special occasions and everyday wear. The small size of the rhinestones used in these patterns ensures comfort and longevity, making them practical choices for those who work with their hands.
Seasonal Rhinestone Nail Designs

Seasonal nail art offers the perfect opportunity to showcase your creativity while staying on-trend throughout the year. Let’s explore how rhinestones can transform your manicure for each season and special holiday.
Spring and Summer
Spring nail designs featuring floral patterns like daffodils, tulips, and sunflowers gain extra dimension when adorned with colorful rhinestones. These iridescent gems catch light beautifully, mimicking the vibrant renewal of spring. Summer designs transition naturally to beach-themed elements such as seashells, starfish, and palm trees, all enhanced with bright rhinestones that capture the playful essence of the season.
Autumn
Autumn nail art comes alive with earthy tones and nature-inspired designs that perfectly complement the changing season. Creating leaf patterns with warm amber and ruby rhinestones adds sophisticated sparkle to fall manicures. Pumpkin and acorn motifs become statement pieces when their outlines are traced with tiny rhinestones, capturing autumn’s rich palette while maintaining elegance.
Winter
Winter nail designs showcase the season’s icy beauty through snowflakes, mistletoe, and holiday symbols enhanced with rhinestones. Clear, silver, and jet black gems create a sophisticated frosty effect that mimics glistening snow. These cool-toned embellishments transform simple winter designs into luxurious statements perfect for holiday celebrations and winter events.
Holiday-Inspired Rhinestone Arrangements
Christmas nail designs feature festive characters like Santa, reindeer, and snowmen elevated with strategic rhinestone placement. Adding decorative gems, pearls, and caviar beads to holiday motifs creates dimensional designs that capture seasonal joy. Valentine’s Day manicures shine with heart-shaped patterns in romantic pinks and reds, where rhinestones add the perfect touch of love-inspired sparkle.
Halloween designs become dramatically eye-catching when embellished with orange and black rhinestones outlining spooky motifs. Easter nail art transforms with pastel-colored rhinestones highlighting spring symbols like eggs and bunnies, creating a festive yet sophisticated seasonal look.
Summer Beach Vibes with Colorful Rhinestones
Beach-themed nail designs incorporate seashells, starfish, and palm trees accented with vibrant rhinestones that capture summer’s carefree spirit. Turquoise, coral, and sunshine yellow gems mimic the colors of tropical destinations while adding dimension to otherwise flat designs. Ombre and gradient manicures in summer shades gain extra visual impact when topped with iridescent rhinestones that shift colors in different lighting.
Tropical floral designs featuring hibiscus and plumeria flowers become statement pieces when their centers are marked with colorful rhinestones. Pairing these embellished designs with sheer or glossy polish enhances the sparkle effect, creating nails that capture summer’s vibrant energy perfectly.
Rhinestone Nail Art with Complementary Techniques

Elevating your nail art by combining rhinestones with other techniques creates truly spectacular designs. These complementary approaches enhance the sparkle of rhinestones while adding depth and dimension to your manicure.
French Tip with Rhinestones
French tip manicures receive an instant upgrade when rhinestones enter the picture. We love placing a delicate line of tiny rhinestones along the edge of a classic white tip for a subtle yet glamorous effect. Alternatively, you can create a bolder statement by clustering rhinestones at the corner of each tip or forming a cascading pattern down one side of the nail. This classic design technique transforms the timeless French manicure into something truly eye-catching while maintaining its elegant appeal.
Nails with Rhinestones and Glitter
Combining rhinestones with glitter creates a dazzling duo that maximizes shine and dimension. Start with a glitter polish base in complementary colors to your chosen rhinestones for a cohesive look. Place larger rhinestones as focal points surrounded by the sparkling glitter backdrop for a textured, multi-dimensional effect. This pairing works particularly well for special occasions when you want your nails to catch the light from every angle and truly stand out.
Ombre Nails with Rhinestones
Ombre nail designs gain additional depth when enhanced with strategic rhinestone placement. Apply a beautiful color gradation from dark to light across your nails, then position rhinestones at the transition points to highlight the color shift. We find that placing smaller stones at the darker end gradually increasing to larger ones at the lighter end creates a stunning visual flow. This technique emphasizes the ombre effect while adding luxurious sparkle that draws attention to your beautiful color blending.
Rhinestones with Negative Space Designs
Minimalist designs incorporating negative space offer a contemporary approach to rhinestone nail art. Leave portions of your nail unpolished or with a clear base, then strategically place rhinestones to create geometric patterns or simple accents. A single statement rhinestone centered on a clear nail creates an elegant, understated look, while a scattered pattern of tiny stones across negative space achieves a starry-night effect. This approach lets your natural nail show through while still incorporating eye-catching sparkle.
Combining Rhinestones with Hand-Painted Elements
Hand-painted nail art reaches new heights when complemented with rhinestones. Paint delicate floral designs and position rhinestones in the flower centers for a 3D garden effect on your nails. Butterfly patterns gain lifelike qualities when rhinestones form the insect’s body between painted wings. We particularly recommend using rhinestones to highlight the intersections of geometric hand-painted patterns like stripes or chevrons, creating points of interest that enhance the overall design. This combination of techniques showcases both artistic talent and glamorous embellishment in one stunning manicure.
Wedding and Special Occasion Rhinestone Nails

For your most important celebrations, rhinestone nail designs add that perfect touch of elegance and glamour. These special occasion manicures combine sophisticated color palettes with strategic gem placement to create unforgettable looks.
Burgundy, Mauve, and Platinum Elegance
Burgundy, mauve, and platinum color combinations create a sophisticated palette that’s ideal for wedding celebrations and formal events. We love how these rich tones pair with glitter accents and a matte top coat to achieve a luxurious look that photographs beautifully. The contrast between deep burgundy and shimmering platinum provides the perfect backdrop for strategically placed rhinestones that catch the light with every gesture.
French Tips with Rhinestone Moons
Classic French manicures receive a glamorous upgrade with leaf-shaped rhinestone moons that create the illusion of wearing rings on your fingertips. This timeless design works perfectly for brides who want to honor tradition while adding a modern sparkling element. The clean lines of the French tip provide an elegant foundation, while the curved rhinestone placement adds just enough sparkle to draw attention without overwhelming your overall look.
Bridal Rhinestone Nail Designs
Sleek, Sheer, and Sparkly
Brides often prefer a glossy, sheer base color enhanced with carefully positioned rhinestones for a clean yet luxurious appearance. This minimalist approach creates a sophisticated aesthetic that complements rather than competes with the wedding ring and bridal jewelry. The transparent quality of the polish allows your natural nail bed to show through, creating a timeless look that will appear elegant in wedding photos for years to come.
Pink and Black Accents
Short nails with black polish and raised textured details encircling rhinestones offer an understated yet striking bridal option. This design works beautifully for modern brides seeking something beyond traditional white and pink manicures. The textured elements add dimension while creating a secure setting for the rhinestones, ensuring they stay perfectly in place throughout all the celebration activities.
Rhinestone Flower Patterns
Intricate flower patterns adorned with rhinestones create beautifully feminine nail art perfect for spring and summer weddings. These designs often incorporate multiple sizes of rhinestones to create depth and visual interest across the nail surface. Flower centers typically feature larger gems surrounded by smaller ones to mimic petals, creating a three-dimensional effect that catches light from multiple angles.
Red Carpet-Worthy Rhinestone Manicures
Chrome Nails with Rhinestones
Chrome finishes combined with rhinestone accents produce a dazzling, eye-catching look worthy of any red carpet event. The reflective surface of chrome polish amplifies the sparkle of strategically placed gems, creating a manicure that literally shines under camera flashes. This bold combination works particularly well on longer nail shapes where the metallic surface has more area to reflect light.
Holographic Nails with Rhinestones
Holographic polish that shifts colors in different lighting conditions pairs magnificently with rhinestones for a multi-dimensional sparkle effect. This attention-grabbing design choice creates nails that seem to dance with color and light. The constantly changing holographic background provides a magical canvas that enhances the brilliance of each carefully placed rhinestone.
Matte Nails with Rhinestones
Contrasting matte polish with glittering rhinestones creates a dramatic juxtaposition of textures that photographs beautifully. This sophisticated technique works especially well with deep, rich colors like burgundy or mauve that provide a velvety background. The flat finish of the matte topcoat makes each rhinestone appear even more brilliant by comparison, creating focal points that draw the eye to your perfectly manicured hands.
Creative Placement Ideas for Rhinestone Applications

Taking your rhinestone nail art to the next level depends largely on strategic placement. These creative application techniques can transform a simple manicure into a conversation-starting masterpiece.
Cuticle Line Rhinestone Embellishments
Cuticle line rhinestone placement offers a subtle yet sophisticated enhancement to any manicure. By arranging tiny gems along the base of your nails, you’ll create an elegant frame that draws attention without overwhelming your overall look. This versatile technique works beautifully with a single neat row of uniform rhinestones for a polished appearance or with strategically scattered stones for a more whimsical, star-like effect. The cuticle placement creates an unexpected focal point that elegantly frames your entire nail bed.
Geometric Rhinestone Patterns
Geometric rhinestone designs deliver modern, eye-catching appeal to your manicure. We’ve found that arranging rhinestones in precise shapes such as triangles, squares, or chevrons creates structured patterns that feel both artistic and intentional. Try varying the sizes and colors of your rhinestones within these geometric formations for added visual interest and dimension. This technique works particularly well on a solid color base coat where the defined shapes can truly stand out, giving your nails a trendy, contemporary edge that showcases your attention to detail.
Colored Rhinestone Nail Art Inspirations

Colored rhinestones add dimension and personality to your manicure, transforming simple nails into statement pieces. These tiny gems come in countless hues and can be arranged in various patterns to create eye-catching designs.
Emerald Green Elegance
Emerald green rhinestones set against a nude base create an instantly luxurious and sophisticated look. This regal color combination exudes opulence while maintaining wearability for special events. Adding white floral accents decorated with gold rhinestones can elevate this design to new heights of glamour.
Vibrant Color Combinations
Mixing and matching different colored rhinestones allows for endless creativity in your nail designs. Red, blue, and yellow combinations offer a playful and energetic aesthetic perfect for casual occasions. These vibrant rhinestone arrangements can transform even the simplest manicure into a conversation starter.
Seasonal Color Stories
Rhinestones provide the perfect opportunity to embrace seasonal themes through strategic color selection. Christmas designs pop with red and green gem arrangements, while Easter manicures shine with delicate pastel-colored stones. Summer calls for bright neon rhinestones that capture the season’s vivacious energy.
Multi-Colored Rhinestone Mosaic Designs
Create stunning mosaic effects by strategically placing various colored rhinestones in artistic patterns. These designs transform your nails into miniature works of art with dimension and visual interest.
Mosaic Gradient Patterns
Alternate different colored rhinestones to form striking gradient or geometric patterns that catch the light from every angle. Cheetah print designs enhanced with multi-colored rhinestones offer a ever-changing and fashion-forward approach to animal print manicures. These intricate arrangements showcase your attention to detail.
Floral Rhinestone Arrangements
Multi-colored rhinestones arranged in floral patterns create a three-dimensional garden on your fingertips. Placing stones in petal formations allows for creative expression through color blocking and layering. These botanical-inspired designs bloom with rhinestones in complementary or contrasting colors.
Whimsical Shape Designs
Butterfly, heart, and other playful shapes crafted from mixed colored rhinestones add charm and character to your manicure. These whimsical elements draw attention and showcase your personality through nail art. Positioning these rhinestone shapes strategically creates focal points on select accent nails.
Monochromatic Rhinestone Nail Looks
For those who prefer a more understated elegance, monochromatic rhinestone designs offer sophisticated glamour without overwhelming color.
Diamond Studded Simplicity
Scatter clear or silver rhinestones across a sheer or nude base for a “quiet luxury” aesthetic that whispers rather than shouts. This minimalist approach to rhinestone placement creates a subtle sparkle effect that works for both professional settings and special occasions. The monochromatic palette ensures timeless elegance.
Rhinestone French Tips
Traditional French manicures receive a glamorous upgrade with rhinestones placed along the tips. White-tipped nails adorned with clear or silver rhinestones create a cohesive and refined look for weddings and formal events. This elevated take on a classic style balances tradition with modern sparkle.
Chrome and Rhinestone Harmony
Pairing chrome nail polish with rhinestones in the same metallic shade creates a sleek, unified design with dimensional interest. Silver chrome polish complemented by silver rhinestones offers a futuristic yet elegant manicure option. This monochromatic approach ensures your nails look polished and intentionally designed.
DIY Rhinestone Nail Techniques

Creating stunning rhinestone nails at home is easier than you might think. With the right techniques and tools, you’ll achieve salon-quality results without very costly.
- Prepare Your Base
Start by shaping and buffing your nails to create a smooth surface. Apply a quality base coat to protect your natural nails and help the polish adhere properly.
- Apply Your Polish
Paint a thin coat of nail polish as your base color. This step is optional but provides a solid foundation for your rhinestone design.
- Place Your Rhinestones
Gather your rhinestones and prepare a few drops of top coat. Use an orangewood stick or crystal pickup tool dipped in top coat to lift and place each rhinestone in your desired pattern.
- Secure Your Design
Apply a layer of top coat over the rhinestones and cure under a UV or LED lamp for 60 seconds. This initial sealing process helps lock the stones in place.
- Add Final Protection
Apply two additional coats of top coat, curing each layer for 60 seconds. These extra layers create a durable shield that keeps your rhinestones secure.
- Clean and Moisturize
Remove any sticky residue with a lint-free wipe soaked in rubbing alcohol. Finish by applying lotion and cuticle oil to keep your hands and nails hydrated.
Tools and Products for Perfect Rhinestone Application
- Placement Tools
Orangewood sticks or crystal pickup tools provide precision when positioning tiny rhinestones. These specialized tools make handling small gems much easier than using fingers alone.
- Quality Adhesives
Top coat serves as the primary adhesive for securing rhinestones. Choose a high-quality gel top coat that cures to a hard, clear finish under UV or LED light.
- Base Products
A good base coat creates the perfect foundation for your rhinestone design. This protective layer prevents staining and enhances the longevity of your manicure.
- Light Source
UV or LED lamps are essential for curing gel products. These devices ensure your rhinestones remain firmly attached by properly setting the adhesive layers.
- Rhinestone Selection
Varied sizes and shapes of rhinestones allow for creative design possibilities. Stock up on different options to experiment with unique patterns and effects.
- Cleanup Supplies
Lint-free wipes and rubbing alcohol help remove the sticky inhibition layer after curing. These finishing tools ensure your rhinestone manicure looks clean and professional.
Long-Lasting Rhinestone Placement Methods
- Sandwich Technique
Apply a thin layer of top coat before placing rhinestones, then seal with another layer on top. This sandwich method creates strong adhesion from both below and above the stones.
- Complete Curing Cycles
Cure each layer of top coat for the full recommended time, typically 60 seconds. Proper curing prevents premature lifting or loss of rhinestones during daily activities.
- Multiple Protection Layers
Build up at least two additional coats of top coat over your rhinestones. Each layer adds strength to the seal, creating a protective dome over your design.
- Strategic Placement
Position rhinestones away from the very edge of nails where they might catch on fabric. Centrally placed designs tend to last longer without snagging or breaking.
- Regular Maintenance
Avoid harsh chemicals and wear gloves when doing dishes or cleaning. These preventative measures protect the integrity of your rhinestone adhesive.
- Gentle Hand Movements
Use the pads of your fingers instead of nails when texting or opening items. This mindful approach helps preserve your rhinestone design for maximum wear time.
Trending Rhinestone Nail Designs for This Season
Rhinestone nail art offers endless possibilities for expressing your personal style. Whether you prefer bold statement designs or subtle accents these tiny gems transform ordinary manicures into extraordinary works of art.
From elegant French tips with sparkling borders to full-coverage dazzlers that catch every light we’ve explored designs for every occasion and preference. The versatility of rhinestones makes them perfect for both special events and everyday wear.
Remember that with the right tools and techniques you can create these stunning designs at home. Quality adhesives proper application and careful maintenance will ensure your rhinestone manicure stays beautiful longer.
We’d love to see your rhinestone nail creations! Tag us on social media and share how you’ve incorporated these sparkling accents into your unique nail art.
Frequently Asked Questions
How long do rhinestone nail designs typically last?
Rhinestone nail designs generally last 2-3 weeks with proper application and care. Using quality nail glue and sealing with multiple layers of top coat significantly extends longevity. Avoid activities that might catch or pull at the stones, like digging in purses or pockets. Regular touch-ups with clear top coat can also help maintain your sparkling manicure.
What tools do I need to create rhinestone nail art at home?
Essential tools include a base coat, colored polish, top coat, specialized nail glue or gel, a wax pencil or orangewood stick for stone placement, tweezers for precision, rhinestones in various sizes, and a UV or LED lamp if using gel. Beginners might also benefit from having a rhinestone picker tool and a small dish to hold stones while working.
Are rhinestone nails suitable for everyday wear?
Yes, with strategic design choices. Opt for minimalist designs with fewer stones on select fingers for everyday wear. Placing rhinestones on ring fingers or as subtle accents works well for daily activities. If you work extensively with your hands, consider rhinestone placement away from fingertips to prevent snagging and premature loss.
How do I remove rhinestone nail designs without damaging my nails?
Soak your nails in acetone for 10-15 minutes to dissolve the adhesive. For stubborn stones, gently slide an orangewood stick under the edge after soaking. Never force or pry off rhinestones as this can damage your natural nail. Follow removal with cuticle oil and moisturizer to rehydrate nails and surrounding skin.
Can I combine rhinestones with other nail art techniques?
Absolutely! Rhinestones pair beautifully with numerous techniques including glitter, ombre effects, hand-painted designs, negative space concepts, and matte or chrome finishes. These combinations create dimension and visual interest. For beginners, try adding rhinestones to an existing manicure technique you’re comfortable with before creating more complex designs.
What are the best occasions for rhinestone nail designs?
While versatile enough for anytime wear, rhinestone nails particularly shine for weddings, proms, anniversaries, holidays, and special celebrations. Full rhinestone coverage works well for galas and formal events, while subtle accents suit professional settings. Seasonal designs with appropriately colored stones can enhance holiday manicures throughout the year.
How can I make sure my rhinestones stay in place?
Apply rhinestones to slightly tacky polish or specialized nail glue. Press firmly but gently into place using a wax pencil or orangewood stick. Seal with 2-3 layers of quality top coat, allowing each layer to dry completely. For maximum durability, cap the free edge with top coat as well to prevent lifting. Avoid harsh chemicals and wear gloves for cleaning.
What’s the difference between using nail glue versus gel for rhinestone application?
Nail glue provides quick adhesion without needing curing equipment but typically offers less durability. Gel adhesion requires a UV or LED lamp to cure but creates a stronger, longer-lasting bond. Gel application also allows more working time to perfect placement before curing. For beginners, nail glue is more accessible; for lasting results on special occasion manicures, gel is preferred.