Getting ready for Halloween isn’t just about costumes and decorations—it’s about embracing the spooky spirit from head to toe, literally! Halloween toe nail designs offer a fun, subtle way to celebrate the season even when you’re wearing your favorite boots or sneakers.
10 Spooktacular Halloween Toe Nail Designs to Try This October
1. Glowing Jack-o’-Lantern Toes
Jack-o’-lantern designs transform your toenails into mini pumpkins perfect for Halloween. Start with a bright orange base coat on all toenails, focusing especially on the big toe. Once dry, use a thin brush to paint black triangular eyes and a jagged smile. For an extra spooky touch, add a coat of glow-in-the-dark topcoat to make your pumpkins light up in the dark just like the real thing.
2. Creepy Spider Web Accent
Spider web toenail art creates an instantly recognizable Halloween look that’s surprisingly easy to achieve. Apply a dark base color like black, deep purple, or navy blue to all toes. Using a fine detail brush or toothpick, draw thin white lines radiating from one corner of your big toe nail. Connect these lines with curved strokes to form the web pattern. Complete the design by adding a tiny spider embellishment on one toe for a truly spine-tingling effect.
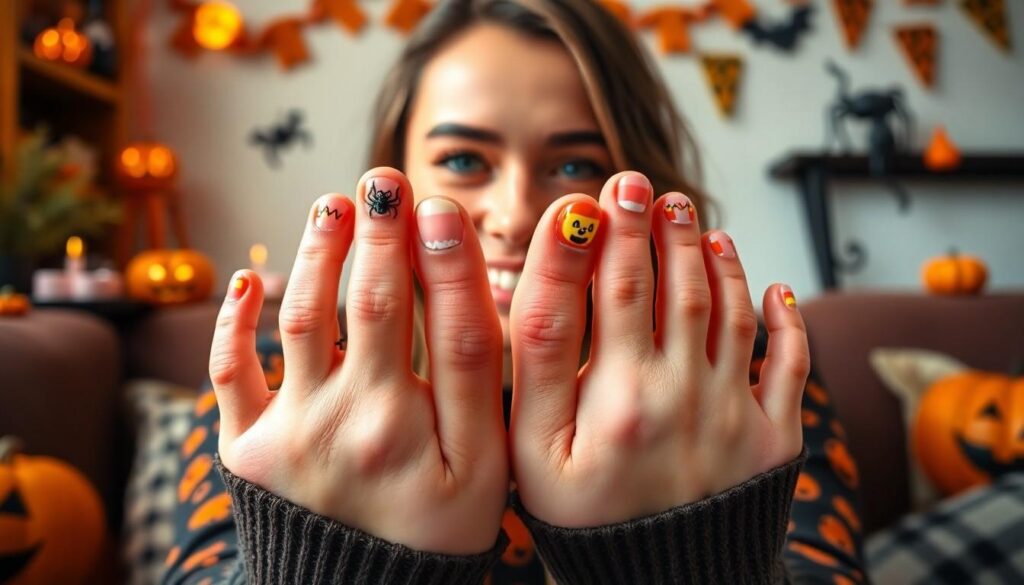
3. Ghost and Boo Designs
Ghost designs offer a cute yet spooky option for Halloween toenails. Paint all nails with a base color of your choice—black works beautifully for contrast. On your big toe, create a small white ghost shape and add tiny black dots for eyes. On adjacent toes, paint the word “BOO” in white, dedicating one letter to each toe. This playful design works wonderfully for those who want something festive without being too elaborate.
4. Blood Drip French Tips
Blood drip designs elevate the classic French manicure with a Halloween twist. Apply a nude or light pink base to all toenails and let dry completely. Instead of the traditional white tip, paint the tips of your nails with bright red polish. While the red polish is still slightly wet, use a toothpick to drag small portions downward to create realistic “drips” of blood. Seal with a glossy top coat for a wet-looking finish that’s delightfully disturbing.
5. Candy Corn Gradient
Candy corn inspired nails bring a sweet touch to your Halloween toe art. Begin with a white base on all toenails. Once dry, use a makeup sponge to create a gradient effect by applying orange polish to the middle section of each nail. Follow with yellow polish at the tips, blending slightly where the colors meet. The result mimics the iconic tri-color pattern of everyone’s favorite Halloween candy, creating a nostalgic and festive look.
6. Full Moon and Bat Silhouettes
Moon and bat designs capture the essence of Halloween night. Paint all toenails black except for the big toe, which should be a midnight blue. On the big toe, create a round white or silver circle to represent the full moon. Using a fine detail brush, add small black bat silhouettes flying across your other toenails. This design creates a mystical nighttime scene right on your feet.
7. Frankenstein’s Monster Accent
Frankenstein toe art transforms your big toe into the iconic monster. Apply a bright green base to your big toenail and black polish to the rest. Once the green is dry, paint a straight black line across the top to create the flat-top hairline. Add two small black rectangles for eyes and short black lines for the stitches and mouth. Finish with two small bolts on either side using silver polish for a design that’s instantly recognizable.
8. Witchy Stripes and Hats
Witch-themed toenails bring magical charm to your Halloween look. Paint alternating toenails in purple and black stripes to mimic witch stockings. On your big toe, create a small black witch hat with a purple ribbon around the base. This whimsical design pays homage to one of Halloween’s most iconic symbols while maintaining a playful, not-too-scary aesthetic that’s perfect for the season.
9. Skull and Crossbones Minimalist Design
Skull designs offer a classic Halloween symbol with edgy appeal. Keep the design simple by painting all toenails black except for the big toe, which should be white. On the white nail, use a thin black brush to draw a small skull with crossbones underneath. The stark contrast between the black and white creates a bold look, while the minimalist approach keeps it sophisticated rather than cartoonish.
10. Mummy Wrapped Toes
Mummy wrapping designs turn your toenails into tiny ancient Egyptian monsters. Start with a white base coat on all nails. Once completely dry, use a thin brush to paint random, horizontal gray or slightly off-white lines across each nail to mimic bandages. Leave small gaps between some lines to create the wrapped effect. Add two tiny red or black dots on each nail to represent eyes peeking through the bandages for a cute yet creepy finishing touch.
Bewitching Black Cat Toe Nail Art

Black cats are iconic Halloween symbols that make for a purr-fectly spooky yet adorable toe nail design. This simple silhouette art creates a bewitching look that’s surprisingly easy to achieve even for nail art beginners.
Creating the Perfect Cat Silhouette
Start by applying a nude or beige base coat to your toe nail, creating the perfect backdrop for your feline friend. Once the base is dry, use black nail polish to paint a semicircle shape at the tip of your toe nail, forming the cat’s head. Add two small triangular shapes at the top of the semicircle to create those distinctive cat ears. For facial details, use a thin nail brush to add white dots for eyes and, if desired, a small curved line for the nose and a slight smile. These simple shapes transform your nail into an instantly recognizable Halloween cat silhouette that’s both cute and spooky.
Adding Glowing Eyes for Extra Spook Factor
Take your black cat design to the next level by giving it eerie glowing eyes that captivate attention. Apply small white dots for the eyes, then add straight black lines for pupils using a skinny nail brush for precise detail work. For a truly haunting effect, top the white eye dots with glow-in-the-dark nail polish or clear topcoat mixed with glow-in-the-dark glitter. Alternatively, tiny dots of neon paint applied after your nail polish has completely dried can create a similar glowing effect. Finish the entire design with a clear top coat to seal your artwork and add shine, ensuring your bewitching black cat toe nail art lasts throughout all your Halloween festivities.
Ghoulish Ghost Designs for Your Toes

Ghostly figures make perfect Halloween toenail designs that combine spooky charm with a touch of whimsy. These spectral creations can be as simple or detailed as you want, making them accessible for nail artists of all skill levels.
Simple White Ghost Patterns
Creating basic ghost designs on your toenails requires minimal supplies and skill. Start with a clear or light-colored base coat to provide the perfect canvas for your spooky spectres. Apply white nail polish to form simple ghost shapes—try oval or circular bodies with flowing, wavy edges at the bottom to capture that classic floating ghost appearance. Add personality to your ghosts with basic black polish details, focusing on eyes and mouth expressions that can range from friendly to frightening. These uncomplicated designs work beautifully on your big toe as a feature nail or across multiple toes for a haunting parade of spirits.
Glow-in-the-Dark Ghost Effects
Take your ghostly toenail art to the next level with glow-in-the-dark effects that truly capture the supernatural essence of Halloween. Apply your white ghost design as normal, then incorporate specialized glow-in-the-dark polish to highlight key features like the eyes or the entire ghost figure. This technique creates an eerie effect when the lights go out, making your toenails come alive with ghostly illumination. For maximum impact, ensure the glow-in-the-dark polish is completely dry before sealing with a top coat to preserve the luminous effect longer. These glowing designs make a surprising statement when you kick off your shoes at Halloween parties, adding an unexpected element of spooky fun to your costume.
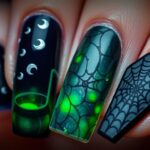
Creepy Cobweb Toe Nail Creations

Transform your toes into a spooky Halloween masterpiece with intricate cobweb designs that are sure to captivate attention. These eerie designs are perfect for Halloween parties or adding a subtle touch of spook to your everyday look.
Achieving Perfect Cobweb Lines
Creating perfect cobweb lines starts with choosing the right base color, typically white or a light shade that makes your design pop. Apply this base coat evenly and allow it to dry completely before beginning your web design. For precise lines, invest in a thin nail brush specifically designed for detailed nail art work. You’ll achieve better results by using nail guides or stickers if freehand techniques feel challenging at first. Many nail artists practice on nail wheels or fake nails before tackling their actual toenails to perfect the technique. When you’re ready, use black polish to create intersecting lines in a web pattern, starting from the center and working outward. For a more realistic effect, try using a makeup sponge to create an ombré look, blending the black polish gradually into your base color for a shadowy, dimensional appearance.
Spider Accents to Complete the Look
Spider accents bring your cobweb design to life and complete your creepy Halloween toe nail look. After your cobweb design dries, add small black spiders either at the center of the web or lurking at the edges of your toenails. Paint the spider’s body as a small oval or circle first, then carefully add eight thin legs extending outward. Detailed spiders can feature tiny eyes created with white or red polish using a small dotting tool, giving them a more realistic and spine-chilling appearance. Those uncomfortable with freehand painting can use nail stickers or decals for equally impressive results. These small but impactful details transform your Halloween toe nail art from simple to spectacular, creating a conversation-starting design that showcases your Halloween spirit.
Pumpkin Patch Pedicure Ideas

Nothing says Halloween quite like a pumpkin patch, and now you can bring that festive feeling right to your toenails with these creative designs.
Jack-o’-Lantern Face Techniques
Jack-o’-lantern toenail art creates an instantly recognizable Halloween look that’s both playful and spooky. Start with a vibrant orange base coat on each toe you want to feature this classic design. Once dry, use black nail polish to carefully paint triangular eyes and a curved, gap-toothed smile that captures that iconic pumpkin face expression. For those less confident in their freehand abilities, nail stickers offer a simpler approach while still achieving that perfect jack-o’-lantern grin. Adding small details like eyebrows or nose shapes can give each toe a unique personality, turning your feet into a miniature pumpkin patch with different expressions.
Textured Pumpkin Designs
Creating dimension in your pumpkin toenail art elevates the design from flat to fantastically realistic. Apply an orange base coat, then use a small brush or dotting tool to add vertical ridges that mimic a real pumpkin’s texture. Nail stamps specifically designed for texture can also achieve this effect with minimal effort. Enhance the three-dimensional appearance by adding shadow and highlight details—use darker orange or brown shades along the edges and lighter orange or white highlights in the center of the pumpkin. Green polish creates realistic stems and leaves that complete the look, while adding small patches of brown “soil” at the base of your toenails ties the entire pumpkin patch theme together. Textured top coats can also add a subtle bumpy finish that feels like touching an actual pumpkin when you run your finger across your completed nail art.
Bloody Drip Nail Art for Horror Fans

For horror enthusiasts looking to take their Halloween spirit to the next level, bloody drip nail art offers a delightfully macabre touch to your spooky season pedicure. This eye-catching design embraces the essence of classic horror while allowing for creative expression on your toenails.
Creating Realistic Blood Drip Effects
Achieving realistic blood drips starts with selecting the right base color for maximum impact. Begin by applying a white or light-colored polish to make the blood effect truly stand out against the contrasting background. After your base coat has dried completely, grab your blood-red polish and swipe the brush back and forth over a paper towel to remove excess product, which helps create a more subtle, stained appearance rather than thick, uniform coverage.
Gently run the brush over your toenails in a downward dripping motion, starting from the cuticle and working toward the tip to mimic natural blood flow. For added dimension and realism, use a small detailing brush to create more defined drips with varied lengths and widths. Build up the blood-red polish gradually with light coats to achieve a more natural dripped effect that looks like actual blood rather than just red polish.
Enhance the realism by adding small droplets at the tips of your drips using a dotting tool. These tiny details make all the difference, creating the impression of fresh blood that’s just about to drip off your toenail—perfect for sending shivers down anyone’s spine who catches a glimpse of your horrifying yet artistic pedicure.
Incorporating Metallic Elements
Metallic accents elevate bloody nail art from simply spooky to sophisticatedly sinister. Use metallic polishes in gold, silver, or copper to add unexpected glamour to your horror-themed design. These shimmering hues work beautifully to outline your blood drips, creating definition and adding a luxurious quality to the gruesome effect.
Try painting a sophisticated nude or beige base coat before adding your blood drips, then use metallic polish to create complementary designs like small spider webs emerging from the blood or tiny bats flying around the carnage. The striking contrast between the neutral base, vivid red drips, and gleaming metallic accents creates a modern twist on classic horror imagery.
Metallic polish also proves perfect for adding small details to elevate your design—use it to create eyes or mouths on Halloween characters, or even to highlight “wounds” from which your blood drips appear to flow. For those less confident in freehand techniques, metallic nail stickers or decals featuring Halloween icons like skulls, spiders, or daggers can be strategically placed near your blood drips for an instantly polished look with minimal effort.
Skeleton Bone Toe Nail Designs

Looking to add a spine-chilling touch to your Halloween pedicure? Skeleton bone toe nail designs offer the perfect blend of spooky and stylish for the season. These bone-inspired creations will make your feet Halloween-ready whether they’re peeking out of sandals or hiding in boots.
Classic Skeleton Bone Patterns
Create striking skeleton designs by painting white or beige bones against a black or dark-colored background. Using nail guides or stickers helps achieve perfectly straight lines for realistic bone structures. A small detail brush allows you to paint intricate phalanges on each toe nail with anatomical precision. Adding red or purple accents around the bones mimics blood or shadows, giving your design an extra spooky dimension that’s perfect for Halloween parties.
Minimalist Bone Patterns
Opt for a sleek, minimalist approach with simple bone silhouettes that make a subtle yet haunting statement. A thin brush works best for drawing clean outlines of bones on a neutral or dark background. Focusing on just one or two bones per nail keeps the design elegant and understated while maintaining the Halloween theme. Light-colored polish on a dark base creates eye-catching contrast that emphasizes the bone patterns without appearing too busy. This approach delivers sophisticated Halloween style that works for all occasions.
Glow-in-the-Dark Skeleton Options
Transform your toe nails into a nighttime spectacle with glow-in-the-dark skeleton designs that illuminate after dark. Start with a black base coat before painting bone structures using specialized glow-in-the-dark polish. These luminous designs create an unexpected surprise when the lights go out, adding interactive fun to your Halloween look. Glow-in-the-dark polish can also enhance other spooky elements like eyes on jack-o-lanterns or spider webs, making your entire pedicure come alive at night. Applying a compatible clear top coat helps preserve the glowing effect throughout your Halloween festivities, ensuring your skeleton toe nails remain hauntingly bright.
Candy Corn Inspired Gradients

Looking for a sweet Halloween toe nail design that’s instantly recognizable? Candy corn inspired gradients offer a festive nod to the iconic Halloween treat while keeping your toes looking stylish and seasonal.
Perfect Color Combinations
Creating the classic candy corn look requires three essential colors: yellow, orange, and white. Start by applying yellow polish to the base of your nail, orange in the middle section, and white at the tip to perfectly mimic the beloved Halloween candy. For a more precise application, nail guides or tape can help create clean lines between each color section. Experimenting with different shades can add unique depth to your design—try a softer pastel yellow or a rich burnt orange for a modern twist on the traditional candy corn palette. Adding complementary Halloween colors like black, purple, or red as accent details can elevate your candy corn design to a more comprehensive Halloween theme.
Adding Sparkle to Your Candy Corn Design
Transform your candy corn gradient from simple to spectacular by incorporating sparkle elements. Apply a clear glitter top coat over your completed gradient for an all-over shimmer effect that catches the light with every step. Targeted sparkle placement works beautifully too—try adding glitter just to the white tips for a frost-like finish or to the orange middle section for a sunset glow. Nail stickers or rhinestones shaped like candy corn can provide dimensional detail to your design without requiring advanced nail art skills. Finishing your candy corn toe nail art with a high-quality top coat ensures your design remains chip-free throughout your Halloween festivities while adding a professional glossy finish that makes colors pop.
Mystical Moon and Stars Toe Nail Art

Transform your toes into a magical night sky with mystical moon and star designs that perfectly capture the Halloween spirit. This enchanting nail art combines celestial elements with a touch of witchy charm for a truly spellbinding pedicure.
Creating Celestial Backgrounds
Start by applying a dark blue or black base coat to mimic the night sky on your toenails. Use a makeup sponge to create a stunning gradient effect that transitions from deep blue at the cuticle to lighter shades toward the tip, giving your design dimension and depth. Add white or silver polish with a small detail brush to paint stars of varying sizes across your toes. For an easier application, nail stickers with star and moon designs work wonderfully when free-hand painting feels challenging. Enhance the mystical feel by applying glitter polish or loose glitter over your stars and crescent moon designs. This sparkle creates a magical effect that catches the light with every step. Make sure to seal your celestial background with a clear top coat before adding additional elements.
Adding Witch Silhouettes
Paint a dramatic witch silhouette against your starry background for that perfect Halloween touch. Use a thin nail art brush to carefully outline the witch’s form, including distinctive features like her pointed hat, flowing cape, and broomstick. Position your witch silhouette against a full moon for maximum visual impact. Those less confident with free-hand techniques can opt for witch-themed nail stickers, which provide detailed silhouettes without the steady-hand requirement. Create depth in your design by adding flying bats around the witch or wisps of clouds across the moon. Apply a lighter shade of gray or white to highlight certain parts of the silhouette, making the design pop against the dark background. Seal your completed witch and celestial design with a quality top coat to protect your artwork and extend its wear throughout the Halloween season.
Frankenstein Monster Toe Designs

Create a frighteningly fun Halloween pedicure inspired by the classic monster with these Frankenstein toe nail designs. This iconic character offers the perfect combination of spooky and recognizable elements for your Halloween toe art.
Building the Perfect Green Base
The foundation of any Frankenstein Monster toe design starts with selecting the perfect green polish. We recommend applying a vibrant green nail polish as your base color to capture the creature’s signature skin tone. Choose from a range of shades—anything from a light mint green to a deep forest green works wonderfully depending on your preference. Apply two even coats for full coverage and allow them to dry completely before moving to the next step. This green base sets the stage for all the monstrous details you’ll add later.
Adding Stitch Details and Bolts
Frankenstein’s iconic stitches and neck bolts truly bring this design to life. Grab a small nail brush and black polish to create thin, horizontal or vertical lines across your green base, mimicking the monster’s stitched-together appearance. Position these stitches strategically—they can be random or follow a pattern resembling the character’s face. For the distinctive bolts, paint two small squares or rectangles on either side of the nail near the cuticle area. Add a small dot or line in the center of each bolt for a more realistic three-dimensional effect. Those who find freehand painting challenging can use nail stickers or guides for more precise bolt shapes. Complete your Frankenstein design by adding facial features such as two small circles for eyes and a curved line for the mouth using black or white polish, instantly transforming your toes into mini monsters ready for Halloween.
DIY Halloween Toe Nail Tools and Techniques
Let’s face it—Halloween toenail art isn’t just fun it’s a perfect way to carry the spooky season with you everywhere. We’ve shared our favorite designs from pumpkins to blood drips and everything in between but remember the magic is in making these ideas your own.
All you need are some basic tools: fine-tipped brushes dotting tools and perhaps a few nail stickers for those intricate details. Don’t stress about perfection—Halloween is all about embracing the slightly imperfect and creepy!
These designs work wonderfully for Halloween parties costume events or just bringing a smile to your face when you kick off your shoes at home. Whether you go bold with bloody drips or subtle with mystical moons your toenails can be your little secret celebration of the spookiest season.
Frequently Asked Questions
How do I create a Halloween jack-o’-lantern toenail design?
Start with a bright orange base coat on your toenails. Once dry, use a thin brush and black polish to paint simple jack-o’-lantern faces – triangular eyes, nose, and a jagged smile. For extra flair, add a green stem at the nail base or use glow-in-the-dark top coat for a nighttime effect. Seal with a quality top coat to prevent chipping. This design works on toenails of all sizes, though larger nails allow for more detailed faces.
Are Halloween toenail designs difficult for beginners?
Not at all! Many Halloween designs are beginner-friendly. Start with simple options like ghost designs (white blob shapes on a light background) or candy corn gradients. Use nail stickers or decals if you’re not confident with freehand painting. Practice on a nail wheel first to build confidence. Remember that Halloween designs are meant to be fun – a bit of imperfection can even add to the spooky charm!
What supplies do I need for Halloween toenail art?
The basic supplies include: base coat, top coat, orange, black, white, and green nail polishes for classic Halloween colors, thin detail brushes for designs, dotting tools for precise details, nail guides or tape for clean lines, and optional items like glow-in-the-dark polish, nail stickers, or glitter for embellishment. A good cleanup brush and acetone will help perfect your design edges.
How can I create a spiderweb toenail design?
Apply a light base color (white, pale blue, or light purple works well). Once dry, use black polish and a thin detail brush to draw a central point, then create lines extending outward like spokes. Connect these lines with curved lines to form the web. For added drama, paint a small spider or add a spider nail charm. This design looks especially effective on the big toe with simpler designs on smaller toes.
How long do Halloween toenail designs typically last?
With proper application and maintenance, Halloween toenail designs can last 2-3 weeks. For maximum longevity: use a quality base coat, apply thin layers of polish allowing proper drying time between coats, seal with a good top coat (reapply every few days), avoid prolonged water exposure, and apply cuticle oil daily. Toenail designs generally last longer than fingernail art since they experience less wear and tear.
What’s a simple bloody drip nail design for Halloween?
Apply a nude or light pink base coat. Once dry, use red polish and a dotting tool to create small pools of “blood” at the tip of each nail. Use the brush to drag the red polish downward, creating drip effects of varying lengths. Add small droplets alongside the main drips for realism. Seal with a glossy top coat for a wet-look effect that enhances the bloody appearance.
Can I combine multiple Halloween designs on different toes?
Absolutely! Creating an accent toe (usually the big toe) with a detailed design while using complementary simpler designs on other toes creates a cohesive look. Try a detailed jack-o’-lantern on your big toe with alternating orange and black on smaller toes, or a cobweb on your big toe with tiny spiders on other nails. Just maintain a consistent color palette for a unified Halloween theme.
How do I create a candy corn gradient toenail design?
Start by applying a white polish at the tip of your nail (about 1/3 of the nail). Once dry, apply orange polish to the middle third, slightly overlapping the white. Finally, apply yellow polish to the base third, blending slightly where it meets the orange. For a smoother gradient, use a makeup sponge to dab the colors on. Seal with top coat for a glossy finish.
Are there any quick Halloween toenail options if I’m short on time?
Yes! Apply a Halloween-themed color like orange, black, or purple as a base. Add pre-made nail stickers or decals (pumpkins, ghosts, bats) for instant designs. Alternatively, use a dotting tool to create simple patterns like polka dots in contrasting Halloween colors. A glitter top coat in orange, black, or purple can also festively transform a basic pedicure with minimal effort.
How can I make my Halloween toenail designs glow in the dark?
Purchase a specialized glow-in-the-dark nail polish (available at most beauty stores during Halloween season). Apply your chosen design, then coat with the glow polish. For maximum effect, “charge” the polish under bright light before entering dark areas. Alternatively, apply the glow polish as a base coat under translucent designs, or use it to highlight specific elements like ghost eyes or pumpkin mouths for a spooky surprise effect.