Looking to make a statement with your manicure? Glow in the dark nail designs are the perfect way to add some unexpected magic to your look. These luminous creations transform from stylish daytime nail art into mesmerizing nighttime displays that’ll have everyone asking about your secret.
We’ve gathered the most captivating glow in the dark nail ideas that combine trendy aesthetics with that wow-factor luminescence. From subtle accents to full-on cosmic creations, these designs work for any occasion—whether you’re hitting a festival, planning a night out, or just want to add some fun to your everyday style. With the right products and techniques, you’ll be surprised at how easy it is to create these eye-catching effects at home.
10 Mesmerizing Glow in the Dark Nail Ideas for Your Next Manicure
1. Cosmic Galaxy Nails
Transform your fingertips into miniature universes with cosmic galaxy nails that glow under blacklight. These eye-catching designs feature swirls of deep blues and purples with splashes of fluorescent dots resembling stars. Apply a black base coat first, then use a makeup sponge to dab on blue and purple polishes in random patterns. Add glow in the dark particles over the top and seal with a clear topcoat for a manicure that’s truly out of this industry.
2. Neon Geometric Patterns
Geometric patterns take on an entirely new dimension when they glow in the dark. Start with a neutral base like white or clear, then use thin brushes to create triangles, squares, and lines with neon glow polishes. These structured designs appear sophisticated during daylight hours but reveal their playful luminous side when the lights go down. For added precision, nail tape can help create perfect straight lines before applying your glow topcoat.
3. Ghost Flame Nails
Ghost flame designs bring dramatic flair to your fingertips with their ethereal appearance. Apply a black or dark blue base, then use a thin brush to paint flame-like tendrils with white or pale blue glow polish. The flames appear subtle during the day but transform into hauntingly beautiful glowing elements at night. This edgy look works perfectly for Halloween parties or rock concerts where your hands will catch attention in low lighting.
4. Glow-in-the-Dark French Tips
Reinvent the classic French manicure with a luminous twist that maintains daytime elegance. Apply your preferred nude base color, then create the tip using a bright white glow polish instead of regular white. During daytime, these nails look like a sophisticated traditional French manicure, but in darkness, the tips illuminate with a soft glow. This versatile style transitions seamlessly from professional settings to evening events.
5. Hidden Message Nails
Create nails with secret messages or symbols that only reveal themselves in darkness. Paint your nails with a regular color of your choice, then use a fine brush and glow polish to write words or draw small designs that remain invisible in normal lighting. When the lights go out, your personal messages or symbols magically appear. These conversation-starting nails are perfect for festivals or parties where you can surprise friends with your hidden nail art.
6. Ombré Glow Effect
Ombré effects gain magical qualities when created with glow-in-the-dark polish. Start with a dark base at the cuticle, gradually blending to a lighter shade at the tips. Apply glow-in-the-dark topcoat more heavily toward the tips for a gradient effect that glows more intensely at the ends of your nails. This creates a striking visual impact in darkness, with your nail tips appearing to float in space.
7. Glow Dot Confetti
Confetti-inspired nail art delivers a festive vibe that lights up any celebration. Apply a clear or nude base coat, then use a dotting tool to create dots of various sizes with different colored glow polishes. During the day, these dots look like cheerful confetti, but in darkness, they transform into a constellation of glowing spots. This playful design adds a fun element to birthday celebrations or New Year’s parties.
8. Underwater Glow Scene
Create an enchanting underwater scene that comes alive in darkness. Paint a blue or teal base, then add details like seaweed, fish, or bubbles using glow-in-the-dark polish. In normal light, your nails showcase a pretty ocean theme, but in darkness, these elements glow like bioluminescent sea creatures. This design offers a whimsical conversation starter and works beautifully for summer beach parties or pool events.
9. Glow Marble Effect
Marble nail art gains an ethereal quality when created with luminous elements. Start with a white or light-colored base, then create traditional marble swirls using a mix of regular and glow-in-the-dark polishes. Drag a thin brush or toothpick through the wet polish to create delicate veining patterns. These sophisticated nails maintain an elegant marble appearance in daylight while revealing glowing streaks in darkness that mimic precious opal gemstones.
10. Neon Animal Print
Wild animal prints become even more striking when they glow in the dark. Apply a black or dark-colored base, then create leopard spots, zebra stripes, or snake patterns using glow polishes. These designs maintain a fashionable edge during daylight hours, then transform into vibrant, glowing patterns at night. The contrast between the dark background and illuminated animal print creates a bold statement that’s perfect for nights out or fashion-forward events.
Classic Neon Glow Nail Polish for Beginners

If you’re new to the glow-in-the-dark nail trend, these classic designs offer an easy entry point while still creating stunning effects. We’ve compiled beginner-friendly options that deliver maximum impact with minimal effort.
Stained Glass Inspiration
Stained glass nails create a beautiful luminous effect that’s surprisingly easy to achieve. Apply swatches of yellow, purple, green, and blue glow polish to mimic colorful glass panels. This versatile design works equally well for everyday wear or special occasions, making it perfect for nail art beginners. The multi-colored approach lets you experiment with different glow combinations without requiring precise technique.
Neon Color Combinations
Neon color combinations deliver bold, eye-catching results that glow vibrantly in dark settings. Mix and match bright neon shades like pink, blue, green, and yellow for maximum impact. These colors stand out dramatically against either a bright white or black background, creating an instant cyberpunk or Day-Glo aesthetic. Beginners will appreciate how even simple applications of these colors produce impressive results when the lights go down.
French Tip and Ombré Techniques
French tip and ombré techniques offer subtle yet striking glow effects that work for both casual and formal settings. Apply your glow-in-the-dark polish just at the tips for a modern twist on the classic French manicure. Alternatively, create an ombré effect by gradually blending the glow polish from the tip toward the middle of the nail. These techniques allow beginners to incorporate glow elements without committing to a full nail design.
Starry Night Effects
Starry night effects transform your nails into a miniature night sky with minimal effort. Use glow-in-the-dark nail decal stickers to create a twinkling star pattern across your nails. The simplicity of stick-on decals makes this design perfect for beginners who might not have steady hands for detailed work. The effect mimics twinkling stars against a dark sky, creating a magical look that’s both elegant and playful.
Best Base Colors for Maximum Glow Effect
Selecting the right base color dramatically enhances your glow-in-the-dark nail polish effect. Matte black base polish creates the most dramatic contrast, making glow elements like lightning bolts or geometric patterns stand out intensely when the lights go off. Bright white backgrounds amplify the vibrancy of neon and glow polishes, resulting in colors that pop both in daylight and darkness. Dark gray or blue bases work particularly well for themed designs like Halloween nails, where you might transition from gray clouds to neon green glowing clouds against a blue background.
Top-Rated Glow in the Dark Nail Polish Brands
Finding quality glow-in-the-dark nail products ensures your designs shine their brightest. Sally Beauty offers an excellent selection of glow polishes recommended by their DIY nail expert Juli Russell, perfect for beginners looking for reliable formulations. DipWell provides glow-in-the-dark dip powder options that typically last longer than traditional polish, making them ideal for those who want extended wear from their glowing designs. GellyDrops specializes in both glow-in-the-dark polish and decal stickers, offering beginners a versatile range of products to achieve various effects without advanced nail art skills.
Celestial-Inspired Glow Nail Designs

Bring the mesmerizing beauty of the night sky to your fingertips with these celestial-inspired glow nail designs. These ethereal manicures capture the magic of cosmic wonders while adding that show-stopping luminous effect in the dark.
Starry Night Galaxy Nails
Starry Night Galaxy nails transform your fingertips into miniature universes with twinkling stars against a dark cosmic background. Start by applying a deep blue, black, or purple base coat to create the perfect night sky canvas. Add dimension by layering high-quality glow-in-the-dark polish or mixing glow powder with clear polish to form brilliant stars that shine when lights dim. Tiny dots of silver or holographic glitter strategically placed throughout the design enhance the sparkle effect, mimicking distant galaxies and nebulae. For added realism, you can incorporate swirls of lighter blue or purple to create cosmic clouds that appear to float across your nails, making each finger a unique celestial masterpiece.
Cosmic Moon Phases Manicure
Cosmic Moon Phases manicures showcase the lunar cycle’s beauty with sophisticated glow-in-the-dark elements that illuminate after dark. Apply a midnight blue or black base coat across all nails to represent the night sky backdrop. Paint different moon phases on each nail using bright white or pale yellow glow-in-the-dark polish—featuring everything from new moon to full moon and all phases between. Details make this design truly special, so use a fine brush to add texture to the moon’s surface or a dotting tool to create realistic craters. Maintain consistency in your glow polish application across all moon phases to ensure uniform luminosity when lights go out. This astronomical design works particularly well on longer nails where the moon phases have room to truly shine and tell their celestial story.
Glow-in-the-Dark French Tips with a Twist

Elevate the classic French manicure with luminous elements that transform your nails from day to night. These sophisticated yet playful designs incorporate glow-in-the-dark polish or dip powder to create tips that look elegant in daylight and magical in darkness.
Neon Outlined French Manicure
Neon outlined French tips offer a vibrant take on the traditional manicure by adding a glowing border to your tips. Apply a classic white tip first, then trace along the edge with neon polish that glows in the dark for a double-impact effect. The contrasting outline creates definition while adding an unexpected element of surprise when the lights go out. Try using Kiara Sky’s Gel Art Glow Collection for intense pigmentation and brightness that truly pops. Add small details like tiny stars or dots within the white tip area to enhance the design’s visual interest and create a personalized look.
Glowing Ombré French Tips
Transform your French manicure with a modern gradient effect using glow-in-the-dark polish. Create this eye-catching design by blending from a lighter shade at the cuticle to a deeper tone at the tip, achieving a seamless transition that adds dimension to your nails. The ombré technique works beautifully with a single glowing color or by combining different shades for a multi-dimensional effect. Pair this style with special glow-in-the-dark dip powders for maximum luminosity and longevity. For additional flair, incorporate glow-in-the-dark nail decal stickers like stars or geometric patterns to complement the gradient effect and make your manicure truly stand out both day and night.
Halloween-Ready Spooky Glow Nail Art

Halloween offers the perfect opportunity to showcase some truly unique glow-in-the-dark nail designs. These spooky creations elevate your manicure while adding an eerie element that’s perfect for the season.
Ghostly Silhouettes That Illuminate
Creating ghostly silhouettes on your nails brings a haunting dimension to your Halloween look. You can paint ghost shapes on a darker background using luminescent dip powder or glow-in-the-dark polish for a longer-lasting effect. These spooky characters come alive in the dark, adding an unexpected element to your manicure. Fun designs such as ghost faces, bats, or spiders work exceptionally well for this technique. We love how these silhouettes remain subtle in daylight but transform into glowing apparitions when the lights go out. The contrast between the dark background and the glowing shapes creates a truly spine-tingling effect that’s perfect for Halloween parties.
Jack-o’-Lantern Inspired Glowing Nails
Jack-o’-lantern designs offer a classic Halloween motif that works brilliantly with glow-in-the-dark polish. Use orange glow-in-the-dark polish for the pumpkin body and green or yellow for the stem and facial details to create an authentic carved pumpkin look. Another creative approach involves designing a cloud nail art pattern that transforms into an electric night sky with glowing pumpkins when darkness falls. These designs work with various color combinations, not just traditional orange and green. Matte black polish serves as an excellent base, allowing you to add a streak of green glow-in-the-dark polish down the center to create a “bolt of lightning” effect that looks striking both in daylight and darkness. The versatility of glow-in-the-dark polishes means you can incorporate these effects into French tips, ombré designs, or as an all-over polish for maximum impact during your Halloween celebrations.
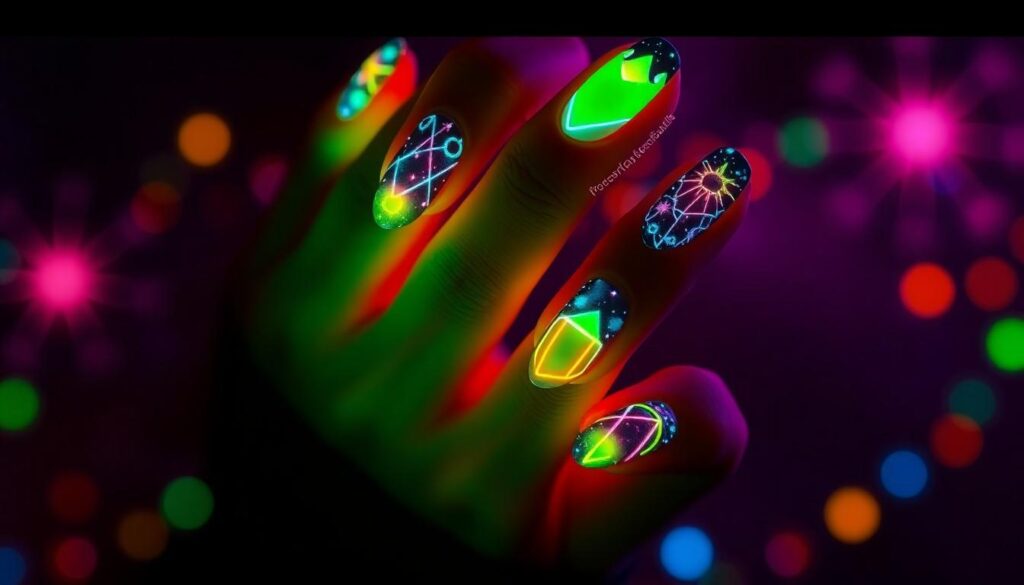
UV Reactive Geometric Patterns

UV reactive nail designs take glow-in-the-dark manicures to the next level by reacting dramatically under ultraviolet light. These designs come alive in club settings, festivals, or anywhere with blacklight illumination, creating a mesmerizing effect that’s impossible to ignore.
Glowing Triangle and Line Designs
Triangle and line designs offer a perfect geometric canvas for glow-in-the-dark nail art. Precision is key when creating these sharp shapes, so we recommend using a fine nail art brush to paint thin, glowing lines directly onto your base color. Nail guides and striping tape work wonders for achieving crisp, straight edges that glow intensely in the dark. Alternatively, pre-made glow-in-the-dark nail decals featuring triangular patterns save time while delivering professional-looking results. Layer your designs with a quality top coat to seal the artwork and enhance the luminosity effect. Many nail artists create striking contrast by combining fluorescent triangles with matte black backgrounds, making the geometric patterns appear to float mystically on your nails when lights dim.
Abstract Neon Color Blocking
Neon color blocking transforms your nails into abstract art pieces that transition from day to night with glowing intensity. Start with a white or light-colored base coat to maximize the glow effect of your neon polishes. Apply blocks of different UV reactive colors using rectangular nail tape as guides to create clean divisions between each glowing segment. Mixing complementary neon shades like electric blue with hot pink creates vibrant contrasts that amplify the visual impact in the dark. The trick to achieving long-lasting color blocks involves applying thicker layers of the glow-in-the-dark polish specifically in the blocked areas. For advanced designs, try overlapping semi-transparent glow colors to create new hues where they intersect, adding depth to your abstract nail art. DIY enthusiasts can even customize their own glow polishes by carefully mixing clear polish with the contents of activated glow sticks for a temporary but striking effect.
Hidden Message Glow Nail Designs

One of the most captivating aspects of glow-in-the-dark nail designs is their ability to conceal secret messages and symbols that only reveal themselves when the lights go out. These hidden nail designs add an element of surprise and personalization to your manicure that’s both fun and mysterious.
Secret Symbols That Appear in the Dark
Creating secret symbols that only appear in darkness is easier than you might think. Start with a base coat that doesn’t glow, such as a matte black polish that creates dramatic contrast when your hidden designs illuminate. Apply your regular polish first, then use glow-in-the-dark polish to paint symbols like stars, hearts, or zodiac signs on top. These designs remain nearly invisible in daylight but transform dramatically when darkness falls. The layering technique works particularly well for subtle symbols that surprise viewers when they suddenly appear. For maximum impact, try creating a “bolt of lightning” effect by painting jagged lines with luminescent polish against your dark background. Glow-in-the-dark nail powders in pastel blues, pinks, or vibrant purples can also be used to create more intricate hidden symbols with varying intensity levels.
Glow-in-the-Dark Text on Nails
Text-based nail art offers a unique way to express yourself through your manicure. Use a fine detail brush to write messages, names, or meaningful words across your nails with glow-in-the-dark polish. Contrasting base colors like dark blue or black make your glowing text stand out more prominently when the lights go off. Words written in luminescent polish can be incorporated into more complex nail designs by using pure white gel polish as a background to enhance the glow effect. Keep messages short and simple for the clearest results—single words like “love,” “magic,” or “boo” work beautifully across individual nails. Seal your text-based design with a clear top coat to protect your message and extend the longevity of the glow effect. Remember to avoid matte top coats when working with neon pigments since they can stick to the matte finish and compromise your hidden message design.
Seasonal Themed Glow Manicures

Elevate your nail game throughout the year with these season-exact glow-in-the-dark designs that capture the essence of each time of year. Our seasonal manicure ideas combine festive themes with luminous effects for truly eye-catching results.
Summer Beach Party Glowing Nails
Summer calls for vibrant, eye-catching manicures that shine even brighter after dark. Neon colors form the perfect base for beach-themed glow nails, with bright pink, green, blue, and yellow polishes creating a fun, tropical vibe. Try painting each nail a different neon shade or create a stunning gradient effect that transitions between colors for dimension.
Ocean-inspired glowing waves make a spectacular statement at beach parties. Paint undulating wave patterns using glow-in-the-dark polish to mimic the ocean’s movement, then add a touch of glitter on top for a shimmering water effect that catches both sunlight and blacklight. Nautical enthusiasts will love glowing seashells and starfish designs paired with a clear or light-colored base coat that makes the luminous details truly pop when lights go down.
Winter Wonderland Luminous Designs
Winter manicures transform into magical displays with glow-in-the-dark elements that complement the season’s festive spirit. Starry night designs capture winter’s clear skies by utilizing glow-in-the-dark nail decal stickers or hand-painted stars against a dark blue or black base coat, resembling the crisp night sky of winter.
Snowflake patterns become enchanting when created with glow-in-the-dark polish. Apply these delicate designs over a white or light blue background for a classic winter wonderland effect that transitions beautifully from day to night. Glowing snow effects add texture and dimension to your winter manicure—layer glow polish over a white or pale base and incorporate fine glitter to simulate freshly fallen snow with a luminous twist.
3D Glow in the Dark Nail Embellishments

Adding dimension to your glow-in-the-dark manicures creates truly spectacular effects that stand out both in daylight and darkness. These 3D techniques take luminous nail art to the next level by combining texture with light.
Glowing Crystals and Rhinestone Placement
Incorporating glowing crystals and rhinestones into your nail designs creates a dazzling effect that’s impossible to ignore. First, apply a small amount of clear nail polish or specialized nail adhesive directly to the desired spot on your nail. Place your glowing crystals or rhinestones carefully on top of the adhesive using tweezers for precision. These embellishments add a spectacular sparkling and illuminated dimension to your manicure, particularly when the lights go down. Try arranging them in geometric patterns, constellations, or along the cuticle line for a bedazzled edge that transitions from daytime glamour to nighttime magic.
Raised Texture Effects That Illuminate
Creating raised texture effects with glow-in-the-dark materials provides dramatic dimension that catches both light and attention. Mix glow powder with acrylic or dip powder (about 25% glow powder to 75% clear powder) for the most durable and long-lasting results. Apply this mixture strategically using a brush dipped in monomer to build patterns, swirls, or dots that physically rise above the nail surface. Nail art tools can help you build up multiple layers, allowing each layer to dry completely before adding the next for maximum elevation. Seal your textured design with a clear top coat to not only protect your creation but also enhance the glow intensity. This technique works wonderfully for creating raised floral designs, abstract patterns, or even intricate 3D landscapes that transform completely when viewed in darkness.
DIY Glow Nail Techniques for At-Home Manicures

Creating your own glow-in-the-dark nails at home is easier than you might think with these professional techniques. We’ve compiled the most effective methods to help you achieve that perfect luminous manicure without a salon visit.
- Glow-in-the-Dark Polish Application
Start with a base coat before applying your special glow-in-the-dark polish. Multiple thin coats will create a more intense glow effect than one thick layer. Finish with a quality top coat to seal in the luminous pigments and extend the life of your manicure.
- Glow Powder Technique
Mix glow powder with clear acrylic or nail polish for a customizable effect. Apply a layer of clear polish first, then sprinkle the glow powder directly onto your nails. Seal everything with another layer of clear polish to lock in the glowing particles.
- Nail Decals Method
Apply glow-in-the-dark nail decal stickers directly to your nails for an effortless starry night effect. These pre-made designs offer precision without requiring artistic skills and can be sealed with a top coat for longevity.
- Acrylic Enhancement
Incorporate glow elements into acrylic nails for a more durable glowing manicure. Mix glow powder directly into your acrylic before application or paint finished acrylic nails with glow polish for dramatic results that last.
How to Create Long-Lasting Glow Effects
- Layer Your Application
Apply multiple thin coats of glow polish rather than one thick layer. Each coat should dry completely before adding the next one to build up intensity without creating a goopy finish.
- Seal Properly
Always finish your glow nail design with a high-quality clear top coat. This protective layer prevents the glow elements from chipping or fading prematurely while adding shine to your daytime look.
- Charge Your Nails
Expose your finished glow-in-the-dark nails to UV light or natural sunlight for several minutes before heading into darker environments. This charging process activates the phosphorescent materials in the polish or powder for maximum brightness.
- Use Quality Materials
Invest in higher-quality glow products that contain more concentrated phosphorescent pigments. Premium products might cost more initially but deliver brighter, longer-lasting glow effects that require less frequent reapplication.
Budget-Friendly Glow Nail Products
- Affordable Glow Polish Options
Look for budget-friendly glow-in-the-dark nail polishes at beauty supply stores or online retailers. Many brands offer reasonably priced options that perform impressively well without the premium price tag.
- Cost-Effective Glow Powders
Purchase glow powder instead of multiple bottles of specialized polish. One container of quality glow powder can be mixed with clear polish you already own to create custom luminous colors for many manicures.
- Reusable Nail Decals
Choose glow-in-the-dark nail decal stickers for an economical way to create detailed designs. These adhesive decorations can be carefully removed and stored for future use when changing your manicure style.
- All-Inclusive DIY Kits
Consider purchasing all-in-one glow nail kits that include everything needed for complete manicures. These comprehensive packages often cost less than buying individual components separately and provide consistent results.
How to Care for and Maintain Your Glow in the Dark Nails
Glow-in-the-dark nails aren’t just a trend—they’re a statement that lights up any occasion. With the designs we’ve shared you’ll be turning heads both day and night.
Remember that proper maintenance extends the life of your luminous manicure. Recharge your glow regularly under natural or artificial light and apply a fresh top coat every few days to preserve the effect.
We love how these glowing designs let your personality shine through literal darkness. Whether you’re creating hidden messages or cosmic galaxies there’s a glowing design for everyone’s style.
Ready to light up the night? Grab your supplies and let your creativity glow!
Frequently Asked Questions
How do glow-in-the-dark nails work?
Glow-in-the-dark nail polishes contain phosphorescent pigments that absorb and store light energy, then release it slowly in dark conditions. These pigments need to be “charged” by exposure to light (natural or artificial) before they can glow. The effect typically lasts for several hours after charging and gradually fades until recharged again.
How long does the glow effect last on nails?
The glow effect typically lasts 2-4 hours after charging, depending on the quality of the polish and how well it was charged. Higher-quality glow polishes may glow longer. The effect will fade gradually over time but can be recharged repeatedly by exposing your nails to light again.
Do I need special equipment to create glow-in-the-dark nails?
No special equipment is required beyond the glow-in-the-dark polish itself. Basic nail tools like base coat, top coat, and nail brushes are sufficient. For more complex designs, you might want fine detail brushes, nail tape for clean lines, or stencils. A UV light can help charge the polish quickly, but natural or regular indoor lighting works too.
Can I apply glow-in-the-dark polish over any color?
Yes, but the base color significantly impacts the final effect. Light colors like white or pastels make the glow appear brighter and more vibrant. Dark backgrounds create dramatic contrast when the lights go out. For maximum glow intensity, apply the luminous polish over a white base coat to reflect more light.
Are glow-in-the-dark nail polishes safe?
Most modern glow-in-the-dark nail polishes are formulated to be safe for cosmetic use. Many brands now offer non-toxic, “n-free” formulas (free from harmful chemicals like formaldehyde, toluene, and DBP). If you have sensitive skin or allergies, look for hypoallergenic options and always perform a patch test before full application.
How can I make my glow-in-the-dark nail design last longer?
To extend the life of your glow design, apply multiple thin layers of the glow polish rather than one thick coat. Always use a quality base coat to prevent staining and a durable top coat to seal the design. Reapply top coat every 2-3 days to maintain shine and protect the glow effect. Avoid harsh chemicals and wear gloves for cleaning.
What’s the difference between glow-in-the-dark and UV reactive nail polish?
Glow-in-the-dark polish contains phosphorescent pigments that store light and emit it in darkness without additional stimulation. UV reactive polish (or neon polish) contains fluorescent pigments that only glow when exposed to UV/blacklight and stop glowing when the light source is removed. Some products combine both effects for versatility.
Can I create glow-in-the-dark designs on acrylic or gel nails?
Absolutely! For acrylics, you can mix glow powder with clear acrylic powder before application or apply glow polish over fully cured acrylics. For gel nails, use gel-based glow products that cure under a UV/LED lamp. You can also apply regular glow polish over fully cured gel with a non-wipe top coat for a hybrid approach.
Which brands offer the best glow-in-the-dark nail products?
Top-rated brands include Sally Beauty’s glow collection, DipWell’s luminous powders, and GellyDrops’ glow gel polishes. Other reliable options are Madam Glam, Beetles, and Live Love Polish, all offering vibrant glow effects. For DIY enthusiasts, brands like Born Pretty and Amazon’s Emori provide affordable glow powders that can be mixed with clear polish.
Do I need to remove glow-in-the-dark polish differently than regular polish?
No special removal process is needed. Use regular nail polish remover for traditional glow polishes. For gel-based glow products, follow standard gel removal procedures with acetone soaking. Some glitter-infused glow polishes might require a bit more soaking time, but the removal process remains the same as with their non-glowing counterparts.