Looking for a way to express your creativity and add a touch of glamour to your everyday look? Pretty nail art ideas are the perfect solution! We’ve curated an inspiring collection of designs that’ll transform your manicure from basic to breathtaking in no time.
From elegant minimalist patterns to bold statement pieces, the industry of nail art offers endless possibilities for self-expression. Whether you’re a nail art novice or a seasoned pro, you’ll find something to love among these stunning ideas. We’ll guide you through the hottest trends, essential tools, and simple techniques to achieve salon-quality results at home.
10 Stunning Pretty Nail Art Ideas to Elevate Your Manicure
1. French Twist Manicure
The classic French manicure gets a modern update with this stylish twist. Instead of the traditional white tips, try using vibrant colors like teal, lavender, or coral for an unexpected pop. You can create this look by applying your base coat, then using striping tape or a thin brush to paint the colorful tips. For added dimension, consider adding a subtle glitter gradient that fades from the tip downward.
2. Minimalist Line Art
Simple geometric patterns can make a big statement with minimal effort. Thin black lines on a neutral base create an elegant, artistic manicure that pairs with everything. We recommend using a fine detail brush and steady hand to create straight lines, crosses, or abstract shapes. This design works beautifully on just one or two accent nails while keeping the rest in a complementary solid color.
3. Pastel Watercolor Blend
Soft watercolor effects produce dreamy, ethereal nails that look professionally done. Apply a white base coat first, then use a small makeup sponge to dab diluted pastel polishes in overlapping patterns. The colors will blend naturally where they meet, creating a beautiful watercolor effect. Finish with a glossy top coat to seal the design and enhance the watercolor appearance.
4. Negative Space Geometric Designs
Incorporating your natural nail into the design creates modern, sophisticated looks. Paint geometric shapes like triangles or crescents while leaving portions of the nail bare. The contrast between the painted areas and negative space produces a chic, contemporary effect that’s both elegant and eye-catching. This technique works especially well with matte topcoats for an ultra-modern finish.
5. Delicate Floral Patterns
Tiny flowers add a feminine touch to any manicure without being overwhelming. Using a dotting tool, create small flower centers with five smaller dots surrounding them to form petals. These pretty botanical designs can be scattered across all nails or concentrated on accent fingers. Seasonal color combinations like pastels for spring or rich jewel tones for fall keep this classic design fresh year-round.
6. Gold Foil Accents
Metallic foil transforms ordinary manicures into luxurious nail art with minimal effort. Apply your base color and let it dry completely, then press small pieces of gold foil onto tacky top coat for a gorgeous gilded effect. The random placement creates an organic pattern that catches the light beautifully. This technique works especially well with deep colors like burgundy, navy, or black for stunning contrast.
7. Gradient Ombré Effect
Color transitions create sophisticated dimension that flatters all nail shapes and lengths. Using a makeup sponge, apply two or three complementary colors in stripes, then dab onto nails to create a seamless gradient. The color blending creates a professional-looking effect that’s actually quite simple to achieve. Vertical ombré designs can also visually elongate shorter nails for an elegant look.
8. Dotted Patterns
Polka dots remain a perennial favorite for their playful simplicity and versatility. Create perfectly symmetrical dots using different-sized dotting tools or the rounded end of a bobby pin. Arranged in patterns like clusters, scattered confetti, or organized rows, these cheerful dots can be as subtle or bold as you prefer. Contrasting colors create the most impact, while tone-on-tone combinations offer sophisticated subtlety.
9. Marble Effect
Swirling patterns mimic the luxurious look of natural marble stone with stunning results. Start with a white or light-colored base, then add drops of different polish colors and swirl them together using a thin brush or toothpick. The random, organic patterns create unique nails every time. Adding metallic accents like gold or silver lines enhances the high-end marble appearance.
10. Holographic Glitter Gradients
Multidimensional sparkle creates eye-catching manicures that shift colors in different lighting. Apply a solid base color, then dab holographic glitter polish concentrated at the tips or cuticles, gradually fading toward the center. The rainbow-reflecting particles create magical dimension that looks increasingly complex as you move your hands. This technique works beautifully on all nail lengths and shapes.
Elegant French Tips with a Modern Twist

The classic French manicure gets reimagined with contemporary elements that breathe new life into this timeless style. These modern interpretations maintain the sophisticated essence of traditional French tips while incorporating fresh colors, textures, and accents.
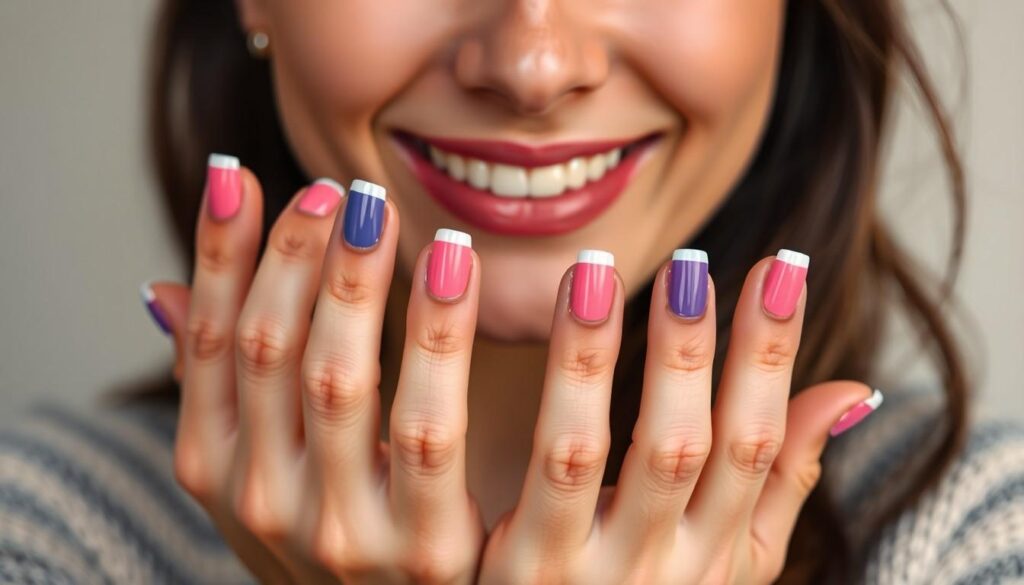
Colored French Tips
Colored French tips offer a playful yet sophisticated alternative to the traditional white-tipped manicure. Replace the classic white tip with bold hues like cobalt blue, emerald green, or fuchsia for an instant statement look. Pastels work beautifully for spring and summer, creating a soft transition from your natural nail bed to the colored tip. Try painting each nail with a different colored tip for a rainbow effect that’s both cheerful and elegant. For a cohesive look, match your colored tips to your outfit or accessories, creating a pulled-together appearance that shows attention to detail. Matte topcoats can transform your colored French tips into something truly unique, adding depth and dimension to this modernized classic.
Glitter-Accented French Manicure
Glitter-accented French manicures combine elegance with eye-catching sparkle for special occasions or everyday glamour. Apply a thin line of fine glitter along the tip boundary to create a delicate shimmer that catches the light with every movement. Gold and silver glitters pair beautifully with neutral bases, while holographic particles produce stunning rainbow reflections when they catch the light. Consider a gradient effect by concentrating the glitter at the tips and allowing it to fade toward the cuticle for a more subtle approach. Chunky glitter placed strategically at the tips creates a bold statement perfect for celebrations and festivities. Seal your glitter-accented French manicure with a thick layer of top coat to ensure a smooth finish and extended wear time that keeps your sparkling tips looking fresh for days.
Dreamy Pastel Watercolor Designs

Watercolor nail art brings a soft, artistic flair to your manicure with its fluid, ethereal aesthetic. These dreamy designs capture the delicate nature of watercolor paintings while transforming your nails into miniature canvases.
Pastel Ombré Effect
Pastel ombré nails create a stunning gradient effect that transitions seamlessly between complementary shades. Start with a white base coat to make your pastel colors pop with maximum vibrancy. Apply different pastel shades to a makeup sponge, positioning them next to each other in your desired gradient order. Dab the sponge gently onto your nails, moving slightly up and down to blend the colors together naturally. Multiple applications will intensify the colors while maintaining that signature watercolor fluidity. Finish with a glossy top coat to seal in your design and enhance the dreamy, dimensional effect that makes watercolor nails so captivating.
Floral Watercolor Patterns
Floral watercolor nail art combines the softness of watercolor techniques with delicate floral motifs for a romantic, garden-inspired look. Begin with a sheer white or nude base to serve as your canvas. Using a thin brush dipped in watered-down pastel polish, create soft petal shapes by gently touching the brush to your nail and allowing the color to naturally spread. Add different flower elements using various pastel shades like lavender, mint, and soft pink for a multi-dimensional garden effect. Strategically place small dots of more concentrated color at the center of your flowers using a dotting tool. These designs work beautifully as accent nails paired with solid pastel colors on your remaining fingers. Complete your floral watercolor masterpiece with a high-shine top coat to protect the delicate artwork while giving it that characteristic watercolor luminosity.
Minimalist Geometric Nail Art

For those who prefer sleek, understated elegance, minimalist geometric nail art offers the perfect balance of sophistication and simplicity. These clean designs make a statement without overwhelming your overall look.
Simple Line Art
Minimalist line art stands as one of the most accessible nail designs for beginners while remaining eternally chic. Start with a neutral base like beige, pale pink, or clear polish to create a clean canvas. Using a fine detail brush or nail art pen, draw thin straight lines, crosses, or angles across your nails. Black lines against a nude background create striking contrast, while metallic lines add subtle glamour to your manicure. Try incorporating asymmetrical patterns or strategic line placement for visual interest without cluttering the nail. These designs work beautifully on nails of any length, though longer nails provide more space for creative patterns. A high-quality top coat will seal your line work and prevent chipping, preserving your minimalist masterpiece for days.
Negative Space Designs
Negative space nail art cleverly incorporates your natural nail within the design, creating sophisticated geometric patterns with minimal effort. Begin with a clear base coat to protect your nails while maintaining transparency. Using striping tape or nail guides, mask off geometric shapes like triangles, squares, or diamonds before applying your chosen polish. Carefully remove the tape while the polish is still slightly wet to create crisp, clean lines. Experiment with complementary colors or stick with classic black or white for timeless appeal. These designs appear particularly striking on almond or coffin-shaped nails where the geometric elements can follow the natural curve of your nail shape. Negative space designs not only look modern but also grow out more gracefully than full-coverage manicures, extending the wear of your nail art between salon visits.
Eye-Catching Floral Nail Art Ideas

Floral nail designs bring a touch of nature’s beauty to your fingertips, combining elegance with artistic expression. These botanical-inspired manicures offer endless possibilities for personalization while staying on-trend year-round.
Delicate Flower Patterns
Dainty floral patterns transform ordinary manicures into wearable art that captures the essence of springtime. Start with a neutral base like soft pink, cream, or clear polish to create the perfect canvas for your floral masterpiece. Using a thin detail brush, paint small flower petals by creating five dots arranged in a circle, then connect them with gentle strokes toward the center. Mix and match flower sizes across different nails for a natural garden-inspired look that feels balanced rather than overwhelming.
For beginners, dry brush florals offer a forgiving technique that creates beautiful results without requiring perfect precision. Simply dab small amounts of polish onto the brush, remove most of the product, and lightly sweep across the nail in petal-like motions. Combining complementary colors like lavender and sage green creates dimension while maintaining a cohesive palette that looks professionally done.
Cherry blossoms and daisy designs rank among the most requested floral patterns due to their simple yet recognizable shapes. These classic motifs never go out of style and pair beautifully with negative space techniques for a modern twist that elongates the appearance of your fingers.
3D Floral Embellishments
Three-dimensional flower elements add captivating texture and depth to your manicure, creating statement-worthy nails that draw admiration. Acrylic flowers molded directly onto the nail surface catch light beautifully while providing a tactile element that flat designs simply can’t achieve. Position these sculptural blooms strategically—try placing a single statement flower on the ring finger while keeping other nails more subdued with complementary colors or smaller accents.
Gel-raised floral designs offer another approach to dimensional nail art that’s slightly more practical for everyday wear. Apply small dots of gel in flower formations, cure under an LED lamp, then hand-paint details to create realistic petals and leaves that appear to float above the nail surface. The slight height difference creates subtle shadows that enhance the three-dimensional effect without catching on hair or clothing.
For special occasions, dried pressed flowers sealed between layers of clear gel provide an organic alternative to painted designs. These real botanical elements create a stunning pressed-flower effect reminiscent of vintage herbariums. Apply a thick top coat to smooth any rough edges and preserve the delicate petals for days of wear without lifting or damage.
Glamorous Glitter and Metallic Accents

Elevate your manicure with dazzling elements that catch the light and demand attention. Glitter and metallic details add instant glamour to any nail design, transforming everyday looks into statement pieces.
Glitter Gradient Nails
Glitter gradient nails create a stunning visual effect that transitions from subtle to spectacular. Start with a solid base color that complements your chosen glitter shade—neutral tones like nude or pale pink work beautifully with gold or silver glitter. Apply the glitter polish at the tip of your nail, working downward with decreasing intensity using a makeup sponge for the most seamless blend. For maximum impact, combine fine and chunky glitters in complementary colors, such as rose gold and copper. Seal your glamorous creation with two coats of high-quality top coat to ensure a smooth finish and extended wear. This technique works particularly well for special occasions or when you want to add subtle sparkle to an otherwise simple manicure.
Metallic Chrome Finish
Metallic chrome nails deliver an ultra-modern, mirror-like finish that mimics liquid metal on your fingertips. Apply a black or dark-colored base coat first to make your chrome powder really pop. Use a special chrome powder applied with a silicone tool or eyeshadow applicator, gently buffing it into a no-wipe gel top coat for that perfect reflective surface. Chrome finishes come in various colors including silver, gold, rose gold, and holographic options for different effects. Combine chrome accents with matte finishes for a striking textural contrast that highlights the metallic elements. Frame your chrome details with thin black lines or geometric shapes to create architectural designs that showcase the reflective qualities. Remember to seal chrome powder with a water-based top coat rather than a regular one to prevent smudging the mirror effect.
Trendy Marble Effect Nail Art

Marble nail art continues to dominate the beauty scene with its luxurious appeal and endless versatility. This elegant technique mimics the swirling patterns of natural stone, creating a sophisticated look that complements any outfit or occasion.
Pastel Marble Designs
Pastel marble nails offer a soft, dreamy take on the classic marble effect that’s perfect for spring and summer. These delicate designs combine light pink, baby blue, mint green, and lavender shades to create ethereal swirling patterns that resemble polished gemstones. Creating this look requires a white base coat followed by small dots of your chosen pastel colors, which you’ll then gently swirl together using a thin nail art brush or toothpick. The key to authentic-looking marble is avoiding overblending—real marble has distinct veins rather than completely mixed colors. Finish with a high-gloss top coat to enhance the stone-like appearance and seal your design for lasting wear. Pastel marble works beautifully on all nail shapes but looks particularly striking on almond or coffin-shaped nails where the pattern has more space to flow.
Gold-Accented Marble Art
Gold-accented marble elevates the classic marble effect with luxurious metallic details that catch the light beautifully. This opulent design pairs well with white, gray, or black marble bases, creating a stunning contrast that draws attention to your fingertips. Begin by creating your marble effect using the wet-on-wet technique with your base colors, then allow it to dry completely before adding the gold elements. Apply thin gold lines using a fine detail brush and gold foil gel or metallic polish to mimic natural veining in marble. Strategically place small gold flakes or use gold leaf for added dimension and texture in key areas. This design works wonderfully for special occasions, particularly weddings and formal events where a touch of glamour is desired. Seal your creation with two layers of top coat to ensure the gold accents stay securely in place and maintain their brilliant shine. The combination of flowing marble patterns and gleaming gold creates a manicure that exudes sophistication while remaining on-trend.
Playful Polka Dot Patterns

Polka dots bring a cheerful, nostalgic element to nail art that never goes out of style. These versatile patterns can be customized for any occasion, from subtle and sophisticated to bold and playful.
Multi-Colored Dots
Multi-colored dots transform ordinary nails into miniature canvases of joyful expression. Start with a neutral base color like white, nude, or clear to make your dots truly pop against the background. Using dotting tools in various sizes, create perfectly round dots in a rainbow of colors across your nails. For beginners, we recommend practicing on paper first to perfect your pressure technique. Position dots randomly for a confetti-like effect or arrange them in deliberate patterns such as diagonal lines or clustered formations. Popular color combinations include primary brights (red, blue, yellow) for a classic look or pastel combinations (mint, lavender, baby pink) for a softer approach. This design works beautifully on all nail lengths and shapes, making it universally flattering.
Gradient Dot Designs
Gradient dot designs elevate the classic polka dot pattern with sophisticated dimension and depth. Create this eye-catching effect by arranging dots in a deliberate pattern that transitions from dense to sparse or from large to small. Using a single color family, place larger dots near the cuticle, gradually decreasing the size as you move toward the tip for an elegant tapering effect. Alternatively, maintain the same dot size but gradually space them further apart as you move across the nail. Color gradients offer another stunning approach—start with deep purple dots at the base and gradually blend through lighter purple, pink, and finally white dots at the tips. For special occasions, combine this technique with metallic polishes that catch the light beautifully. Dotting tools with different tip sizes make achieving precise gradients much easier, allowing for seamless transitions between dot sizes.
Seasonal Pretty Nail Art Inspirations

As the industry transforms with each passing season, our nail art can reflect these beautiful natural changes. Seasonal nail designs allow us to celebrate the unique beauty of each time of year through creative and expressive manicures.
Spring Cherry Blossom Themes
Spring cherry blossom nail art captures the ephemeral beauty of these iconic flowers that signal the arrival of warmer days. Begin with a soft pink or pale blue background to mimic the delicate spring sky behind blooming trees. Delicate pink and white cherry blossoms can be created using a dotting tool to form the flower centers, followed by small brush strokes for the petals. For a more dimensional look, try adding tiny pearl embellishments at the center of larger blossoms to create a 3D effect that catches the light. Gradient backgrounds transitioning from pale pink to white perfectly complement these floral designs, evoking the dreamy atmosphere of walking beneath cherry blossom trees. Pair these designs with a glossy top coat or try a matte finish for a modern twist on this perennial spring favorite.
Winter Snowflake Designs
Winter snowflake nail art transforms your fingertips into a magical winter wonderland that celebrates the season’s frosty beauty. Start with a deep navy, icy blue, or pristine white base to create the perfect canvas for intricate snowflake patterns. Detailed snowflakes can be achieved using a thin striper brush and white or silver polish, focusing on symmetrical patterns with delicate lines radiating from a central point. Glitter topcoats in silver or holographic finishes add a frosty sparkle that mimics ice crystals catching the winter light. Metallic accents work beautifully for holiday-themed winter manicures, especially when combined with snowflake designs for special occasions. Matte top coats give snowflake designs a soft, powdery appearance that resembles freshly fallen snow, creating a sophisticated winter look that’s both festive and elegant.
Celebrity-Inspired Nail Art Trends

Celebrities often set the pace for beauty trends, and their manicures are no exception. We’ve gathered some of the most striking celebrity nail art designs that have graced red carpets and social media feeds, perfect for adding a touch of star power to your next manicure.
Red Carpet Nail Looks
Red carpet events showcase some of the most innovative nail art designs worn by celebrities. Blake Lively frequently opts for subtle crystal accents along the cuticle line, creating an elegant sparkle that complements her gowns without overwhelming them. Zendaya’s geometric metallic designs have become her signature look, featuring clean lines and unexpected color combinations that photographers can’t stop capturing. Lizzo takes a bolder approach with extra-long acrylics adorned with 3D embellishments like miniature chains and custom charms that coordinate with her outfits. Jennifer Lopez favors nude bases with strategically placed rhinestones, demonstrating how negative space can create sophisticated dimension. These celebrity-approved designs work wonderfully for special occasions when you want your nails to make a statement alongside your outfit.
Social Media Nail Art Sensations
Instagram and TikTok have become hotbeds for celebrity nail art trends that quickly go viral. Kylie Jenner’s gradient ombré designs regularly receive millions of likes, sparking salon requests nationwide for similar color transitions. Megan Thee Stallion shares detailed nail art tutorials showcasing her elaborate hand-painted designs featuring anime characters and bold patterns. Cardi B’s extremely long, jewel-encrusted manicures by nail artist Jenny Bui have created an entire aesthetic category known as “Bling Empire” nails. Billie Eilish popularized the monochromatic approach with her signature green roots matching her neon green nails, demonstrating how coordinating your manicure with other style elements creates a cohesive look. Dua Lipa’s mismatched nail art featuring different designs on each finger has inspired fans to embrace creative asymmetry in their own manicures. Celebrity nail artists like Tom Bachik and Chaun Legend have gained massive followings by sharing behind-the-scenes glimpses of creating these show-stopping designs for their famous clients.
How to Maintain Your Pretty Nail Art Longer
With these gorgeous nail art ideas at your fingertips you’re now ready to showcase your creativity and personal style! Remember that proper maintenance will help your beautiful designs last longer. Apply a quality top coat every 2-3 days and wear gloves while cleaning or doing dishes.
Don’t forget that nail art isn’t just about following trends—it’s about self-expression and having fun with your look. Whether you’re drawn to minimalist lines elegant marble effects or bold celebrity-inspired designs there’s something for everyone.
We’d love to see your creations! Tag us on social media with your nail art masterpieces and stay tuned for more inspiration as we continue to explore the endless possibilities of nail artistry.
Frequently Asked Questions
What tools do I need to create nail art at home?
For basic nail art, you’ll need: a base coat, colored nail polishes, a top coat, thin detail brushes, dotting tools, striping tape, and a cleanup brush. For more advanced designs, consider adding nail foils, glitter, rhinestones, a makeup sponge for gradients, and a UV/LED lamp if using gel polishes. Start with quality brushes and a steady hand – these are more important than having dozens of polishes.
How can I make my nail art last longer?
Start with a quality base coat, properly prep nails by removing oils, and cap the free edge with each layer (polish the tip of your nail). Allow proper drying time between layers, apply a generous top coat, and add another top coat every 2-3 days. Avoid harsh chemicals and wear gloves when cleaning. For maximum longevity, consider using gel polishes with proper curing under a UV/LED lamp.
What are some beginner-friendly nail art designs?
Beginners should start with: dotted designs using a dotting tool or bobby pin, French tips with a twist using tape guides, simple stripe patterns with striping tape, gradient effects using a makeup sponge, and basic floral patterns using a dotting tool for petals. One-stroke designs and minimalist line art are also accessible for newcomers with a steady hand.
How do I achieve a perfect French manicure with a modern twist?
For a modern French manicure, apply a sheer base coat and let dry. Instead of traditional white, use vibrant colors, metallics, or glitter for the tips. For clean lines, use French tip guides or striping tape. Create angled, wavy, or V-shaped tips for extra flair. Add minimalist accents like thin lines or small dots along the tip line for sophistication. Seal with a glossy top coat.
What’s the easiest way to create marble effect nails?
For easy marble nails, start with a white or light base coat. Drop small dots of 2-3 colors close together on the nail. Quickly swirl the colors with a toothpick or thin brush using light pressure – don’t over-mix! For a wet marble look, work while polish is wet; for dry marble, let base dry first. Add gold or silver lines for luxury. Seal with a thick top coat to smooth the surface.
How can I incorporate seasonal themes into my nail art?
For spring, use pastel colors with cherry blossom designs or simple floral patterns. Summer calls for bright colors, fruit motifs, or beach-inspired designs. Fall works well with burnt oranges, deep reds, and gold accents or leaf patterns. Winter designs can feature snowflakes, glitter, or metallics for holiday sparkle. Use season-specific colors as bases and add simple themed accents on 1-2 accent nails.
What techniques create dimensional effects in nail art?
Create dimension by layering different finishes (matte, glossy, metallic) or building up designs with multiple polish layers. For true 3D effects, try acrylic flowers, dried pressed flowers, or raised gel designs. Embellishments like rhinestones, pearls, or studs add instant texture. Chrome powders create depth through light reflection. For subtle dimension, try shadow effects by adding darker shades under design elements.
How do I apply glitter for a gradient effect?
For a perfect glitter gradient, apply your base color and let it dry completely. Apply a clear top coat just on the area where you want the glitter. While still wet, use a makeup sponge to dab concentrated glitter polish at the tip, gradually lightening pressure as you move down. For more precision, apply glitter with a small brush in decreasing density. Seal with 1-2 layers of top coat for smoothness.
What are some trendy celebrity-inspired nail art looks?
Current celebrity-inspired trends include Blake Lively’s elegant crystal accents on neutral bases, Zendaya’s geometric metallics with negative space, and Lizzo’s bold 3D embellishments. Kylie Jenner’s gradient ombré effects remain popular, while Billie Eilish’s monochromatic designs with unexpected textures create statement looks. For red carpet inspiration, try long almond or coffin shapes with statement accent nails.
How can I make my at-home nail art look professional?
For professional-looking results, prep nails properly by pushing back cuticles and buffing the surface. Apply thin, even coats of polish and allow proper drying time. Use quality tools, especially thin detail brushes. Practice steady hand techniques by resting your pinky on a surface while working. Clean up edges with an angled brush dipped in acetone. Finish with a high-shine top coat that evens out imperfections.