Looking for ways to express your feminine side through your manicure? We’ve gathered the most stunning girly nail ideas that’ll transform your fingertips into tiny works of art. From delicate pastels to playful glitter accents, there’s something for every girl who loves to keep her nails on-trend.
We know how important it is to find nail designs that match your personality and style. That’s why we’ve curated this collection of ultra-feminine nail art inspirations that range from subtle and sophisticated to bold and eye-catching. Whether you’re heading to a special event or just want to treat yourself to a beautiful manicure, these girly nail ideas will have you falling in love with your hands all over again.
10 Adorable Girly Nail Ideas for Your Next Manicure
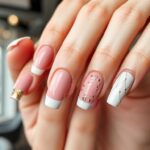
1. Pastel French Tips
Pastel French tips offer a sweet twist on the classic French manicure. Swap traditional white tips for soft pastel hues like baby pink, mint green, or lavender. These delicate colors create an instantly feminine look while maintaining that timeless elegance. You’ll love how this subtle design works perfectly for both casual outings and professional settings.
2. Floral Accent Nails
Floral accents instantly elevate any manicure with their feminine charm. Choose one or two nails on each hand for delicate flower designs while keeping the rest a solid complementary color. Tiny daisies, roses, or cherry blossoms add that perfect touch of girly sophistication without overwhelming your look. These blooming beauties work wonderfully for spring and summer occasions.
3. Glitter Ombré
Glitter ombré nails combine sparkle with gradient technique for an eye-catching effect. Start with a neutral base color at the cuticle that gradually transitions into dazzling glitter toward the tips. This glamorous yet girly style catches the light beautifully and adds instant drama to any outfit. Your fingers will literally sparkle with every movement!
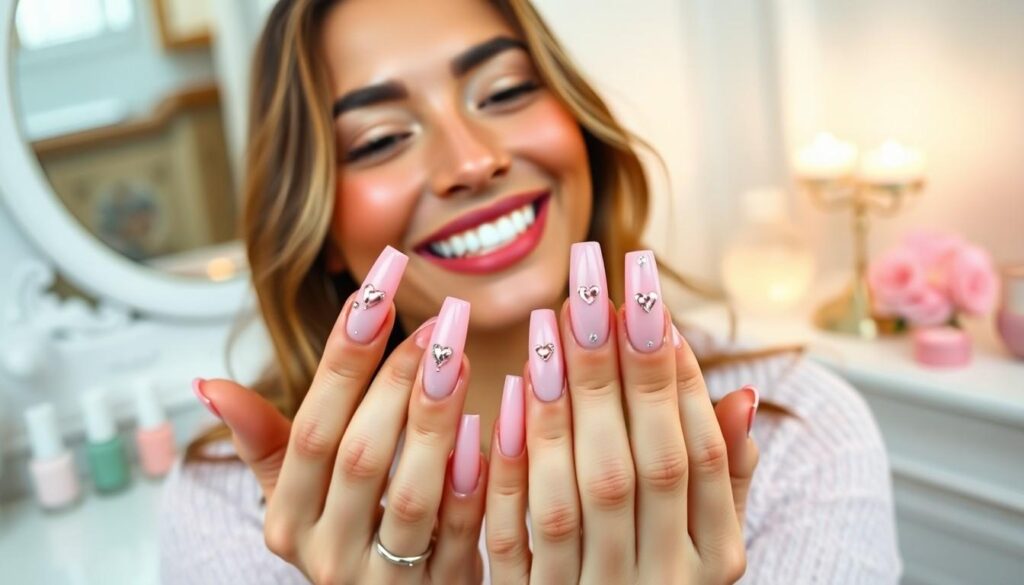
4. Heart Details
Heart details express femininity in the sweetest way possible. Incorporate tiny hearts as accent details on a solid background or create miniature heart French tips for a playful twist. These lovable symbols can be designed in contrasting colors or tone-on-tone for a more subtle approach. Everyone will adore these charming designs that radiate girly vibes.
5. Pearl Embellishments
Pearl embellishments bring elegant dimension to your manicure. Apply a few strategically placed pearl studs along the cuticle line or scattered across an accent nail. These sophisticated 3D elements catch the light beautifully and add luxurious texture to otherwise simple nails. Your hands will look instantly more refined with this timeless girly touch.
6. Pink Marble Effect
Pink marble effect creates a sophisticated yet undeniably feminine look. Swirl together various shades of pink and white to mimic the delicate veining of natural stone. This high-end design appears complex yet remains surprisingly versatile for both special occasions and everyday wear. The subtle pattern variations ensure no two nails look exactly alike.
7. Butterfly Nail Art
Butterfly nail art symbolizes transformation and delicate beauty. Feature these winged wonders as the focal point on accent nails or create a full set of butterfly-themed designs. Vibrant colors or pastel palettes both work beautifully for these eye-catching creatures. These pretty insects make for conversation-starting nail art that’s perfect for spring and summer.
8. Bow Accents
Bow accents add a playful touch of femininity to any manicure. Paint a miniature bow at the base of each nail or create a 3D effect with gel for added dimension. These darling details work well in contrasting colors or subtle tone-on-tone designs for a more sophisticated approach. Your nails will look gift-wrapped and ready for any occasion.
9. Pastel Rainbow
Pastel rainbow designs bring cheerful vibes to your fingertips. Apply different pastel shades to each nail or create gentle rainbow gradients across individual nails. These soft multi-colored looks create an instantly uplifting effect without being overwhelming. The gentle color story provides a perfect balance between playful and pretty.
10. Lace Pattern Details
Lace pattern details evoke romantic femininity with their intricate designs. Create delicate white lace patterns over a nude or pastel base for an elegant effect reminiscent of vintage lingerie. These sophisticated designs can cover the entire nail or just the tips for a more subtle approach. Your manicure will exude feminine charm with these detailed yet delicate patterns.
Pastel Pink Princess Nails: The Ultimate Girly Statement

How to Achieve the Perfect Pink Base
Starting with the right foundation is crucial for creating a flawless pastel pink princess look. Begin by applying a nude or clear base coat to protect your natural nails and ensure better polish adhesion. Next, carefully brush on one to two coats of a soft pastel pink polish, allowing each layer to dry completely before adding another. For a more dimensional effect, try layering a lighter shade over a slightly darker pink tone to create depth and visual interest.
Adding Delicate Embellishments
Elevate your pastel pink princess nails with charming decorative elements that showcase your feminine style. Heart designs make perfect accents—simply use a detail brush to create two dots side by side, then draw a connecting V-shaped line to form adorable mini hearts. Polka dots offer another beginner-friendly option; grab a dotting tool to create dainty spots in complementary pastel colors over a white or pink base.
Glitter accents instantly transform your manicure into a royal statement. Create a stunning ombre effect by placing a small bead of glitter polish at the center of your nail and gently dabbing outward. French tips receive a princess-worthy update when you swap traditional white for pastel pink, finished with a matte top coat for modern sophistication.
Single dot accents provide subtle elegance—place a tiny white dot at the base of each nail for a minimalist yet refined touch. Marble nails complete the princess aesthetic beautifully; achieve this by swirling a few delicate white lines into your light pink base, creating a luxurious pattern that resembles fine porcelain or quartz.
Floral Fantasy: Blooming Designs for Feminine Fingertips

Floral nail designs remain a timeless expression of femininity and grace. These blooming patterns offer endless creative possibilities while maintaining that quintessentially girly aesthetic that’s perfect for any season.
Spring-Inspired Flower Patterns
Spring-inspired flower patterns create the ultimate feminine nail look with their delicate and refreshing appeal. Pastel floral designs are surprisingly easy to DIY at home, requiring only a dotting tool and a few pastel nail polish colors to create sweet, girlish patterns that capture springtime essence. Elegant rose nail designs featuring intricate pink petals on a nude base deliver a romantic and dreamy aesthetic that’s perfect for special occasions or everyday wear. Accent nails with floral motifs paired with complementary solid colors offer a balanced approach to feminine nail art without overwhelming your overall look. Combining colors from your floral design—like pastel pink and baby blue—across your remaining nails creates a cohesive and undeniably cute manicure that ties everything together beautifully.
Techniques for Detailed Petals
Dotting tool techniques provide the perfect starting point for beginners looking to create realistic floral designs with dimensional petals. Using a small nail brush after placing your dots helps elongate petals and add texture that brings your flowers to life on each nail. Marbling techniques create delicate, swirled patterns that authentically capture the organic texture and movement of real flower petals with stunning detail. Layering different colors and finishes adds impressive depth to your floral designs, particularly when using pastel shades for blooms and fresh greens for stems and leaves. Nail stickers offer a fantastic alternative for those without extensive nail art skills, delivering professional-looking floral designs without requiring intricate painting techniques. Minimalist approaches featuring small, delicate flowers with simple lines can be just as effective as more elaborate designs, offering a subtle nod to girly aesthetics while maintaining sophisticated appeal.
Sparkling Glitter Gradient: Girly Glamour at Its Finest

Looking to add some sparkle and shine to your nail game? Sparkling glitter gradients offer the perfect balance of femininity and glamour, creating an eye-catching effect that’s sure to turn heads.
Choosing the Right Glitter Density
Selecting the ideal glitter density is crucial for achieving that perfect girly and glamorous look. We recommend opting for medium to high glitter density to ensure your nails sparkle brilliantly without appearing too cluttered or overwhelming. Start by applying a clear base coat to protect your natural nails and provide a smooth canvas. Next, apply your first layer of glitter polish, allowing it to dry completely before assessing if additional coats are needed. Building up layers gradually gives you more control over the final appearance and allows you to achieve your desired level of sparkle. Remember that different glitter polishes vary in particle size and concentration, so experiment with a few options to find your perfect match.
Creating a Flawless Gradient Effect
Mastering the gradient technique elevates your glitter manicure from pretty to professional. We’ve broken down this process into simple steps anyone can follow:
- Begin with a protective base coat on clean, prepped nails
- Apply a layer of your chosen base color across the entire nail (lighter shades typically work best as a foundation)
- Take a small makeup sponge or brush to apply the glitter polish, starting from the nail tip and working your way down
- Focus the heaviest concentration of glitter at the tips, gradually lightening as you move toward the cuticle
- Use a clean brush or cotton swab dipped in polish remover to blend any harsh transition lines
- Seal your beautiful creation with a generous layer of top coat for added shine and longevity
For additional girly flair, consider incorporating complementary elements like glitter stars, pastel hearts, or delicate jewel accents positioned strategically along the gradient line. Pastel polka dots can also add a playful feminine touch to your sparkling gradient design. These small decorative details enhance the overall glamorous effect while maintaining that ultra-girly aesthetic we’re aiming for.
Sweet Heart Accents: Romantic Nail Art for Every Occasion

Single Heart Focus Nails
Single heart focus nails offer a minimalist approach that makes a romantic statement without overwhelming your manicure. You can create this look by painting a small heart in the center of each nail using your favorite polish color, whether it’s traditional red or something more unexpected. For an elevated design, try using a heart-shaped jewel as the focal point, securing it with clear top coat for longevity. This versatile style works beautifully on a neutral base like nude or clear polish, allowing the heart to truly stand out. Many nail enthusiasts appreciate this design for its simplicity and the fact that it requires minimal artistic skill while still delivering maximum impact.
Heart French Tip Variations
Heart French tip variations reimagine the classic French manicure by replacing the traditional white stripe with playful heart shapes along the nail tips. You can execute this design in white for a subtle twist on the timeless look, or opt for neon colors to create a more vibrant statement. Primary colors like red and pink work wonderfully for a romantic feel, while pastels offer a softer, sweeter appearance. This design pairs beautifully with a clear or nude base to emphasize the heart-shaped tips. Professional nail artists recommend using a thin brush or nail art pen for precision when creating the small heart shapes. French tips with heart accents can be customized for any occasion, from everyday wear to special events like Valentine’s Day or anniversaries.
Bow-Tie Beauties: Charming and Playful Nail Designs

3D Bow Applications
Elevate your manicure with stunning 3D bow applications that instantly add drama and playfulness to your look. These dimensional bows are typically crafted from specialized nail art supplies like acrylic or resin, creating a tactile element that stands out from traditional flat designs. Applying these decorative pieces requires a strong adhesive to ensure they remain securely attached throughout wear. Many nail enthusiasts love these 3D embellishments for special occasions or when they want their nails to make a bold statement. The raised texture of these bows catches light beautifully, drawing attention to your fingertips while showcasing your girly style preferences.
Painted Bow Techniques
Create charming bow designs without the added dimension by mastering painted bow techniques that offer versatility and elegance. Simple bow designs can be achieved using regular nail polish in various colors—pastels work particularly well for a sweet, feminine appearance. Detailed bow art requires finer nail art brushes to paint intricate lines and realistic-looking ribbons that capture the delicate nature of actual bows. Combining bows with complementary elements like glitter stars, pastel hearts, or dainty dots produces an elaborate and cohesive manicure that amplifies the girly aesthetic.
For a French tip variation, try replacing the traditional white tip with a miniature bow design at the nail edge. Adding glitter accents around your painted bows enhances the playful vibe while creating visual interest across your fingertips. These techniques work wonderfully with pastel color schemes, which naturally complement the feminine bow motif. Perfecting these painted techniques gives you the flexibility to adjust the size and placement of your bows, allowing for customized designs that match your personal style.
Pearly Perfection: Elegant Girly Nail Ideas with Iridescence

Pearl-inspired nail designs offer a timeless elegance with a girly twist. These lustrous looks combine sophistication with feminine charm, creating manicures that catch the light beautifully.
Pearl Embellishment Placement
Strategic placement of pearl embellishments can transform your manicure from simple to stunning. Accent nails provide the perfect canvas for showcasing pearl decorations—try placing a delicate pearl on your ring finger for an understated yet elegant effect. For those seeking a luxurious twist on the classic French manicure, small pearls arranged along the nail tips create a sophisticated border that elevates your entire look. Nail art enthusiasts will love incorporating pearls as central elements in designs, such as placing them in the middle of flower patterns or heart motifs for a three-dimensional effect. These versatile embellishments can be applied individually for minimalist appeal or grouped together for a more dramatic statement piece.
Creating a Pearl-Inspired Finish
Achieving that coveted pearlescent glow doesn’t always require actual pearl embellishments. Iridescent nail polishes deliver a magnificent color-shifting effect that mimics the natural luminosity of pearls, reflecting light to create depth and dimension on your nails. Apply a holographic top coat over your favorite base color to instantly add an iridescent sheen reminiscent of precious pearls. Mixing clear glitter polish with a light base creates a subtle yet captivating pearlescent glitter effect that works beautifully in both ombre applications and full-nail coverage.
Elegant Girly Nail Ideas
Marble nail designs using light pink and white polish capture the essence of pearls with their smooth, swirled appearance. Create this effect by gently swirling a few white lines into a light pink base for a classy marbled look that mimics pearl’s natural sheen. Single dot accents made with iridescent polish add a touch of refinement to simple manicures—place a dot at the base of each nail using a dotting tool for an effortless yet sophisticated embellishment. For special occasions, try combining tri-color tips with pearl accents using complementary hues and placing small pearls along the edges of the colors for a multi-dimensional design that’s both elegant and playfully girly.
Soft Marble Swirls: Feminine Takes on Marble Nails

Marble nail designs offer an elegant yet playful way to express femininity through your manicure. These swirling patterns create a sophisticated look that’s both eye-catching and delicate.
Pastel Marble Color Combinations
Pastel tones form the perfect foundation for feminine marble nail designs. Soft pink combined with baby blue creates a dreamy, cotton candy-like swirl effect that looks ultra-girly. White marble accents against light lavender or mint green backgrounds produce an ethereal, cloud-like appearance that’s both subtle and striking. Try using complementary pastels like peach and sage green for a sophisticated take on the marble trend. Multiple pastel shades swirled together mimic the look of semi-precious stones while maintaining a delicate aesthetic. For a more dramatic yet still feminine effect, incorporate a hint of metallic gold or silver into your pastel marble design to add dimension and catch the light beautifully.
Easy Water Marble Techniques
Creating gorgeous marble nails at home requires just a few simple steps and tools. Fill a small cup with room temperature water as cold water can cause the polish to harden too quickly before you’ve created your design. Drop small amounts of your chosen pastel polishes onto the water’s surface, starting from the center and working outward. Use a toothpick or thin nail art tool to gently pull through the colors, creating swirl patterns that resemble natural marble veining. Dip your finger directly into the water, making sure the nail captures the swirled design you’ve created. Clean excess polish from around your cuticles and nail bed using acetone and a small brush or cotton swab. Seal your marble design with a quality top coat to enhance longevity and add shine to your feminine nail art creation.
Polka Dot Prettiness: Timeless Girly Patterns

Polka dot nail art stands as one of the most classic and playful design choices for a feminine manicure. We love how these charming dots can transform even the simplest nail look into something fun and eye-catching. Here are some of our favorite polka dot variations:
- Classic Polka Dots: Evenly spaced dots in contrasting colors create a timeless look that never goes out of style
- Colorful Dotted French Manicure: Traditional French tips get a girly upgrade with colorful dots along the edge
- Minimalist Dots: Small, strategically placed dots offer subtle elegance without overwhelming the nail
Symmetrical vs. Random Dot Placement
The arrangement of your polka dots dramatically affects the overall vibe of your manicure. Symmetrical placement creates a polished, organized appearance that feels intentional and sophisticated. We recommend using a dotting tool or toothpick to ensure even spacing between dots for this precise look. This method works beautifully for formal occasions or when you want your nail art to appear more structured and elegant.
Random dot placement offers a carefree, spontaneous aesthetic that’s perfect for casual, playful looks. This approach allows more freedom during application since exact measurements aren’t necessary. Your nails will exude a whimsical charm that feels less rigid and more artistic. This technique proves especially popular for summer styles or anytime you want your manicure to express creativity without perfectionism.
Mixing Dot Sizes for Visual Interest
Varying dot sizes adds impressive dimension to polka dot nail designs. Large dots can serve as focal points while tiny dots fill spaces between them, creating depth that draws the eye. We’ve found that combining at least three different dot sizes produces the most visually appealing effects, with each size adding a unique layer to the overall design.
The collage effect takes dot variation to another level by overlapping dots of different sizes and colors. This technique involves applying a base color first, then adding multiple colored dots using a dotting tool. Slightly blend the edges of some dots for a cohesive appearance that resembles modern art on your fingertips. This approach transforms simple polka dots into complex, three-dimensional designs that showcase your attention to detail and creativity. For maximum impact, try combining pastel backgrounds with bright dot colors or vice versa.
Candy-Inspired Designs: Sweet Treats for Your Fingertips

Transform your nails into a delectable display with candy-inspired designs that capture the sweetness and playfulness of your favorite treats. These sugary nail art concepts combine whimsical elements with eye-catching colors to create manicures that satisfy your style cravings.
Pastel Heart Candies
Pastel hearts offer a delightful nod to classic conversation heart candies but with a softer touch. Using delicate pink, lavender, mint, and baby blue shades creates a sweet and feminine look reminiscent of Valentine’s Day treats. Apply these heart designs over a neutral base for a subtle effect, or go bold with hearts in various sizes scattered across each nail. The gentle color palette ensures these candy-inspired nails remain sophisticated while capturing the playful essence of sweet treats.
Blooming Candy Flowers
Candy-colored blooming flowers bring dimension and texture to your manicure with a sugary twist. Create these florals using bright, vibrant hues that mimic the colors of gumdrops and jellybeans for a fun, playful effect. The blooming gel base technique adds a 3D quality that makes these flowers pop, resembling actual candy decorations on your fingertips. Accent nails featuring these colorful blooms paired with solid candy-colored nails make for a balanced yet striking manicure.
Sugar-Coated Finish Techniques
Glitter stars deliver that sugar-coated sparkle reminiscent of crystallized candy. Achieve this effect by creating mini triangles that connect to form star shapes, then coating them with a high-shine glitter topcoat that catches the light with every movement. This technique mimics the appearance of sugar crystals on candies, giving your nails that mouth-watering, just-dipped look that’s impossible to ignore.
Bejeweled sugar accents take the candy-inspired manicure to luxurious heights with strategically placed heart-shaped jewels and golden starbursts. These embellishments create a high-end candy shop aesthetic that combines sweetness with sophistication. Apply a clear top coat with suspended micro-glitters to further enhance the sugar-dusted appearance, making your nails look good enough to eat.
Cotton Candy Color Combinations
Pastel color schemes capture the ethereal, fluffy essence of cotton candy with soft pinks, blues, and yellows blended together. Create a gradient effect that transitions between these shades to mimic the swirled appearance of cotton candy, or alternate colors on each nail for a fun fairground vibe. These gentle hues work beautifully as a base for other candy-inspired nail art or stand alone as a sweet statement.
Neutral and bright pairings offer a contemporary take on the cotton candy aesthetic. Starting with a nude or clear base, add pops of bright cotton candy colors through half-moon designs at the nail base or tiny accent details. Yellow half-moons provide a particularly striking contrast against neutral backgrounds, creating a look that’s both girly and sophisticated. This balanced approach allows you to incorporate candy-inspired elements in a more subtle, office-appropriate way while still maintaining that playful edge.
The Girly French Manicure: Modern Twists on a Classic
From delicate florals to playful hearts these girly nail ideas offer endless possibilities to express your unique style. Whether you’re drawn to pearls pastel marble patterns or sweet bow accents there’s something magical about finding the perfect design that makes you feel confident and feminine.
Remember that nail art isn’t just about aesthetics—it’s a creative outlet and form of self-expression. We encourage you to try different combinations of these ideas and even develop your own signature look. Your nails can be your canvas for showcasing your personality.
So grab your favorite polishes experiment with these techniques and watch how the right manicure can elevate your entire look. The perfect girly nails are just a brushstroke away!
Frequently Asked Questions
What are some popular feminine nail art ideas for a manicure?
Popular feminine nail art ideas include pastel French tips, floral accent nails, glitter ombré designs, heart details, pearl embellishments, pink marble effects, butterfly art, bow accents, pastel rainbow designs, and lace pattern details. These designs range from delicate and subtle to playful and eye-catching, offering options for both everyday wear and special occasions.
How do I create a “Pastel Pink Princess” nail look?
Start with a nude or clear base coat, then apply 1-2 coats of soft pastel pink polish. Add delicate embellishments like small hearts, polka dots, or glitter accents for a royal touch. For more dimension, try creating an ombre effect or modernizing French tips with pastel pink. Single dot accents or marble patterns can complete the princess aesthetic.
What are some beginner-friendly floral nail designs?
Beginners can create simple floral designs using a dotting tool and pastel colors. Try accent nails with a single flower design while keeping other nails solid. Nail stickers are a great alternative if you’re less experienced. Minimalist approaches like tiny flower dots on a neutral base are also effective and easier to achieve while still maintaining a feminine look.
How do I create a glitter gradient effect on my nails?
Apply a protective base coat and your chosen base color. Using a makeup sponge or brush, apply glitter polish starting from the tips and blending toward the cuticle, gradually decreasing the density. Seal with a top coat for smoothness and longevity. Enhance your design by incorporating complementary elements like pastel hearts or polka dots for an ultra-feminine finish.
What are some sweet heart accent nail designs?
Try single heart focus nails by painting a small heart in the center of each nail for a minimalist approach. For a playful twist on French manicures, create heart French tips by replacing the standard white tip with heart shapes in various colors. These designs are simple yet romantic and can be customized for different occasions.
How can I create 3D bow designs on my nails?
Use specialized nail art supplies and strong adhesives to apply pre-made 3D bow charms to your nails. Alternatively, paint bow designs using regular nail polish and a thin brush. For a dimensional effect, apply multiple layers of polish to create the bow’s loops and center knot. Combine with complementary elements like glitter or rhinestones for added femininity.
What are some ways to incorporate pearls into nail designs?
Strategically place pearl embellishments on accent nails or as borders on French tips. Use iridescent polishes to achieve a pearlescent glow without actual pearls. Create marble effects with pearl-toned polishes to mimic the sheen of natural pearls. Try single dot accents with iridescent polish or combine tri-color tips with pearl accents for a multi-dimensional look.
How do I create marble swirl nail designs?
Start with a pastel base color like soft pink or baby blue. Drop dots of contrasting polish onto the nail while the base is still wet. Use a thin nail art brush or toothpick to gently swirl the colors together, creating natural marble veining. For water marbling, drop polish into room temperature water, create a pattern, and dip your nail in. Seal with a top coat for a polished finish.
What techniques can I use for polka dot nail art?
Use a dotting tool or the rounded end of a bobby pin for precise dots. For classic polka dots, create evenly spaced dots across the nail. Try colorful dotted French manicures by placing dots along the tips. Mix dot sizes for added visual interest or create a collage effect with overlapping dots. Experiment with symmetrical patterns for elegance or random placement for playfulness.
How can I create candy-inspired nail designs?
Use pastel colors reminiscent of conversation heart candies for a sweet look. Create blooming candy flowers with vibrant, candy-colored hues. Apply a sugar-coated finish using fine glitter topcoats to mimic crystallized sugar. Try cotton candy color combinations with soft pinks and blues or pair neutral bases with bright candy-colored accents for a sophisticated but playful manicure.