Looking to add some serious sparkle to your manicure? Rhinestones are the perfect way to elevate your nail game from basic to breathtaking. We’ve gathered the most stunning rhinestone nail ideas that’ll have everyone asking where you got your nails done.
Whether you’re a rhinestone rookie or a crystal connoisseur, there’s something magical about these tiny gems that can transform even the simplest manicure into a work of art. From subtle accent stones to full-on diamond-inspired designs, we’ll show you how to incorporate these dazzling elements into your next nail appointment or DIY session.
10 Glamorous Rhinestone Ideas for Nails That Will Make You Sparkle
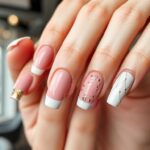
1. French Tip Accent
French tips get an elegant upgrade with strategically placed rhinestones. Apply your favorite nude base and classic white tips, then add a line of tiny rhinestones along the smile line where the white meets the nude. This sophisticated look works beautifully for weddings, formal events, or whenever you want a touch of sparkle without going overboard. The contrast between the classic French manicure and the sparkling gems creates a perfectly balanced look that’s both timeless and trendy.
2. Ombré Rhinestone Cascade
Create a dazzling gradient effect by placing rhinestones in a descending pattern from your cuticle to the tip. Start with densely packed stones near the cuticle, gradually spacing them farther apart as you move toward the tip. Choose stones in varying sizes for added dimension, with larger ones near the base tapering to smaller ones at the tip. This eye-catching design works wonderfully with a neutral base color that allows the rhinestones to truly shine.
3. Accent Nail Statement
Transform one nail on each hand into a stunning focal point completely covered in rhinestones. Apply a strong base coat on your chosen accent nail, then carefully place stones of various sizes to cover the entire surface. Keep the remaining nails in complementary solid colors or with minimal decoration to let the accent nail take center stage. This approach gives you major sparkle without overwhelming your entire manicure.
4. Negative Space Designs
Incorporate rhinestones into negative space nail art for a modern, sophisticated look. Leave portions of your nail unpolished or with a clear base, then create geometric patterns with precisely placed stones. Triangle formations, straight lines, or half-moon designs particularly showcase this technique beautifully. The contrast between the bare nail and sparkling gems creates a striking visual effect that’s both contemporary and eye-catching.
5. Cuticle Crescents
Frame your nails with a stunning rhinestone crescent along the cuticle line. Apply a solid color base of your choice, then carefully place small rhinestones in a curved line following your cuticle shape. This elegant design draws attention to your nail beds while creating the illusion of longer nails. The placement near the cuticle also means this style grows out gracefully, extending the life of your manicure.
6. 3D Flower Formations
Create beautiful three-dimensional flowers using rhinestones as the centerpieces. Create petals using polish or gel, then place a larger rhinestone in the center surrounded by smaller stones to form a blooming flower. Different colored stones can represent various flower types, from daisies to roses. These delicate floral designs add a romantic, feminine touch to any manicure while showcasing your attention to detail.
7. Constellation Inspired Patterns
Design your own celestial masterpiece with rhinestones arranged in star constellation patterns. Apply a deep blue, purple, or black base to represent the night sky, then strategically place rhinestones to mimic your favorite star formations. Connect the stones with thin lines of metallic polish to complete the constellation effect. This cosmic-inspired look brings a bit of mystical elegance to your fingertips.
8. Rhinestone Border Frames
Outline the entire perimeter of your nails with a border of tiny rhinestones for a framed effect. Apply your preferred base color, then carefully place small stones around the complete edge of each nail. This technique creates the appearance of jewelry for your nails, framing and highlighting your manicure beautifully. The rhinestone border works with any base color, though it looks particularly striking against dark or bold backgrounds.
9. Mixed Metal Masterpiece
Combine rhinestones in silver, gold, and rose gold tones for a luxurious mixed metal effect. Arrange stones of different metallic colors in an alternating pattern or random placement atop a neutral base like beige, white, or clear. The varying metallic tones create dimension and complement different jewelry styles, making this versatile design perfect for those who don’t stick to just one metal tone in their accessories.
10. Crystal Placement Gradients
Create a stunning color transition using rhinestones in graduating hues. Arrange stones that shift from one color to another—like clear to blue to purple—across your nails. This technique works beautifully on all nails or as an accent on one or two fingers. The gradient effect catches light differently depending on the angle, creating a ever-changing, ever-changing sparkle that’s sure to grab attention wherever you go.
Elegant French Tip Rhinestone Accents for Timeless Appeal

French manicures have always been a classic choice, but adding rhinestones elevates them to a new level of sophistication. This timeless design combines the clean lines of traditional French tips with the sparkle of strategically placed crystals for a look that’s both elegant and eye-catching.
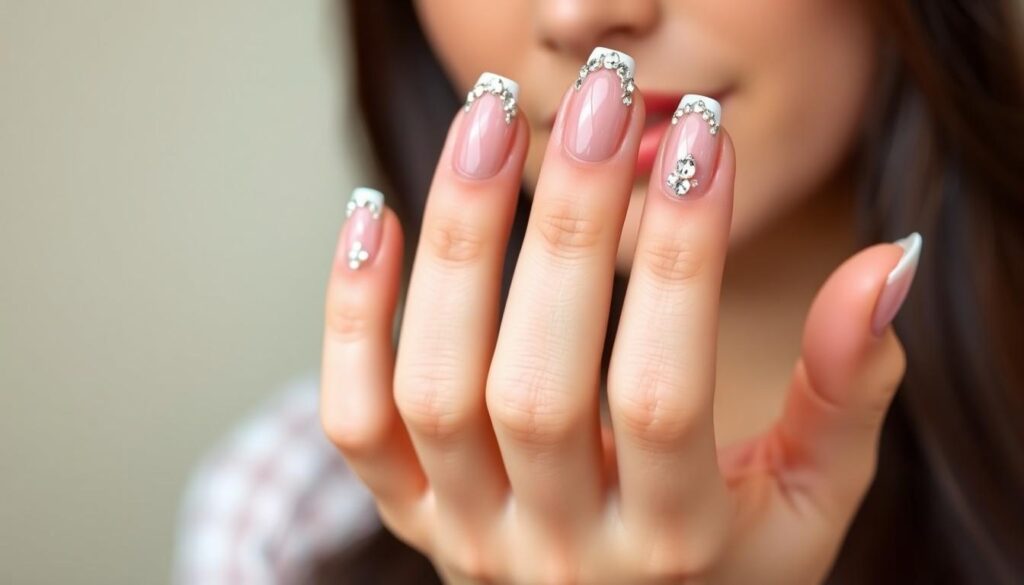
Single Rhinestone Line Along French Tips
Creating a single line of rhinestones along your French tips offers a refined yet glamorous enhancement to the traditional manicure. Start with a small rhinestone at the cuticle area and alternate between larger and smaller stones as you work your way to the nail tip. This technique frames your nails beautifully while maintaining an understated elegance that’s appropriate for both special occasions and everyday wear. Tweezers can help you achieve perfect alignment of the stones, ensuring a polished and professional finish that sparkles with every hand movement.
Scattered Rhinestones on White Tips
Scattered rhinestones across white French tips create a delicate, starry effect that captures light beautifully. Apply rhinestones randomly across the white portion of your French manicure using a small amount of nail glue to secure each crystal firmly in place. For a more structured look, consider spacing the rhinestones evenly or arranging them in small clusters for visual interest. This design works wonderfully with leaf-shaped or moon-shaped rhinestones grouped at the nail tip, creating the illusion of wearing rings on your fingertips while complementing the pristine white gel polish of your French tips.
Dazzling Full Rhinestone Coverage Designs for Special Occasions

When it’s time to truly stand out, nothing makes a statement quite like nails completely adorned with rhinestones. Full coverage designs transform your manicure into wearable jewelry, perfect for weddings, galas, and milestone celebrations.
For a show-stopping look, cover the entire nail surface with a mix of small and large rhinestones. This technique creates dimension and ensures complete coverage that catches light from every angle. Try combining various colors and shapes—round, teardrop, and unique forms—to add texture and visual interest to your design.
Ombré Rhinestone Placement Techniques
Ombré rhinestone placement creates a beautiful gradient effect that transitions smoothly from dense to sparse coverage. Start by applying a base coat followed by a gradient of complementary gel polish colors as your foundation. Once your polish has fully cured, begin placing rhinestones in a graduated pattern with more stones concentrated at the base of your nail and fewer toward the tip.
For secure attachment, apply a small drop of crystal fix nail glue before positioning each stone. Gently press each rhinestone into place, maintaining even spacing to achieve that perfect ombré effect. This technique works beautifully with color-coordinated stones that complement your base polish gradient.
3D Rhinestone Nail Art Creations
3D rhinestone nail art elevates your manicure by incorporating dimensional elements like flowers, butterflies, or geometric shapes. Create depth by strategically using different sized stones—smaller rhinestones for intricate details and larger ones for main design elements.
Layering techniques add exceptional dimension to your 3D nail art. Place a foundation of rhinestones, then build additional layers to create realistic, sculptural effects. Combine rhinestones with complementary nail art elements such as glitter or stickers for truly innovative designs. Always ensure each layer is securely attached with quality nail glue and properly cured to maintain the integrity of your 3D creation throughout wear.
Minimalist Rhinestone Nail Art for Everyday Elegance

Minimalist rhinestone nail designs offer a perfect balance of elegance and simplicity for those who want to incorporate sparkle without overwhelming their look. These subtle yet sophisticated designs work beautifully for everyday wear while still making a statement.
Thin Line Design
Create an effortlessly chic look by placing a thin line of rhinestones down the center of your nail. This simple technique produces maximum impact with minimal effort. You can opt for a straight line for a clean, modern aesthetic or add a gentle curve for a more ever-changing appearance. For added dimension, try outlining a central rhinestone with smaller ones, creating a focal point that catches the light beautifully.
French Tip with Rhinestones
Elevate the classic French manicure by adding rhinestones along the white tip of your nails. This refined approach transforms a timeless design into something special without losing its versatility. Place the stones evenly across the tip for a structured look or arrange them asymmetrically for a more contemporary feel. This design works wonderfully for office settings and transitions seamlessly to evening events.
Matte Nails with Rhinestones
Combine sophisticated matte polish with strategically placed rhinestones for a textural contrast that’s visually stunning. The non-reflective background of matte polish makes each rhinestone pop dramatically, creating an understated yet luxurious effect. Try a neutral matte base with rhinestones placed asymmetrically for an everyday design that feels both modern and elegant.
Single Statement Rhinestone on Each Nail
Make a minimalist statement by featuring one perfectly positioned rhinestone on each nail. Place a larger statement stone at the center of each nail against a simple polish background to create a focal point that’s sophisticated rather than flashy. This technique works beautifully with neutral polish colors like nude, pale pink, or soft gray.
Alternatively, position a small rhinestone at the cuticle base of each nail for a delicate accent that catches the light with every hand movement. This placement creates visual interest while maintaining the clean, minimalist aesthetic that makes these designs so wearable for everyday occasions.
Delicate Rhinestone Dots and Constellations
Transform your nails into a miniature night sky by arranging tiny rhinestones in constellation-inspired patterns. Place small stones randomly across a dark polish base to mimic stars scattered across the night sky. This ethereal design offers sophistication with a touch of whimsy.
Create visual rhythm by alternating rhinestones with hand-painted dots or fine lines on select nails. This technique adds complexity without overwhelming the design, maintaining the minimalist aesthetic while incorporating multiple elements. Try alternating between small clustered rhinestones on one nail and simple painted details on adjacent nails for a balanced look that’s both delicate and eye-catching.
Seasonal Rhinestone Nail Designs for Year-Round Inspiration

Let’s explore how to adapt your rhinestone nail art for every season and special occasion throughout the year, ensuring your manicure always matches the moment.
Summer Beach-Inspired Rhinestone Patterns
Neon nails with rhinestones create the perfect summer vibe, combining vibrant colors like electric pink, lime green, or sunshine yellow with strategically placed crystals for a look that captures beach energy. The bright bases serve as an eye-catching canvas for either scattered rhinestone arrangements or structured linear patterns that catch light like water droplets in the sun.
Chrome nails with rhinestones offer a dazzling reflective finish ideal for summer outings where you want your nails to shimmer like ocean waves. The metallic base intensifies the sparkle of various shaped rhinestones, creating dimension that mirrors the summer sun glinting off water surfaces.
Colorful nail designs with rhinestones embrace summer’s playful spirit through polka dots, stripes, or tropical floral patterns enhanced with crystal accents. We particularly love pairing turquoise or coral bases with clear rhinestones to evoke the feeling of exotic beach destinations while maintaining a sophisticated edge.
Holiday and Festival Rhinestone Nail Ideas
Valentine’s Day nails shine with romantic rhinestone embellishments on red or pink backgrounds. Heart-shaped rhinestones arranged in sweet patterns make an adorable statement, while cupid’s bow designs with tiny crystal arrows demonstrate thoughtful attention to thematic details.
Easter nail designs feature pastel foundations adorned with rhinestones forming bunny silhouettes or decorating miniature egg patterns. The combination of soft spring colors with carefully placed crystals captures the season’s renewal energy with a festive twist.
Halloween inspires dramatic rhinestone nail art using deep purples, oranges, and blacks as base colors. Rhinestone spider designs crawl across midnight backgrounds, while crystal-outlined bat silhouettes and pumpkin patterns elevate the spooky season with unexpected glamour.
Rhinestone snowflake nails transform winter manicures into miniature wonderlands, featuring intricate crystal patterns against white, silver, or pale blue backgrounds. These designs capture seasonal magic while offering sophisticated elegance appropriate for holiday parties and winter celebrations.
Birthday nails with rhinestones celebrate personal milestones through confetti-inspired crystal placement, bow designs, or even age numbers subtly incorporated into festive patterns. The personalized approach makes these designs perfect for marking special occasions with style.
Wedding nails demand sophisticated rhinestone applications, such as French tips with crystal moons or elegant burgundy and mauve color schemes enhanced with strategically placed stones. The leaf-shaped rhinestone moons particularly complement bridal aesthetics while maintaining timeless appeal.
Festival nails change with the seasons, from spring’s pastel florals with rhinestone centers to fall’s auburn and gold bases featuring crystal leaf patterns. These designs allow you to celebrate seasonal transitions through thoughtfully crafted nail art that stays on-trend throughout the year.
Creative Rhinestone Shapes and Patterns to Express Your Style

Geometric Rhinestone Arrangements
Linear patterns offer a simple yet elegant rhinestone placement that instantly elevates your manicure. Creating a thin line of rhinestones from cuticle to tip provides a sophisticated look that works with any nail color or shape. Alternating between large and small rhinestones adds visual interest while maintaining a clean aesthetic. S-curve designs incorporate rhinestones in flowing, wave-like patterns across the nail, creating movement and dimension that catches the eye. For those preferring subtlety, scattered rhinestones paired with a sheer wash color deliver a natural yet luxurious appearance. These geometric arrangements combine mathematical precision with artistic flair, making them perfect for both professional settings and special occasions.
Floral and Nature-Inspired Rhinestone Designs
Flower outlines created with rhinestones bring natural beauty to your fingertips. Starting with a central rhinestone as the flower’s center, smaller stones placed around it form delicate petals that capture light beautifully. Add dimension by using additional glue to create 3D effects that make your floral designs truly pop. Butterfly and flower accents incorporating strategically placed rhinestones create vibrant, eye-catching designs perfect for spring and summer. Nature-themed nail art can feature rhinestones depicting leaves, branches, or abstract organic patterns that reflect the natural industry. These designs range from intricate garden scenes to minimal leaf outlines, allowing you to connect with nature through your nail art. Rhinestones in varying sizes enhance the organic feel of these nature-inspired designs while adding luxurious sparkle to your manicure.
Mixed-Media Rhinestone Nail Art That Combines Textures

Mixing textures creates depth and visual interest in rhinestone nail art, turning your manicure into a multi-dimensional masterpiece. When different elements come together, they create a unique aesthetic that catches the eye and showcases your creativity.
Incorporating Design Elements
Rhinestones pair beautifully with other decorative accents to create stunning mixed-media designs. Try combining sparkling gems with hand-painted flowers for an elegant look, such as a nude base featuring vibrant green stones alongside white floral designs accented with gold rhinestones. Butterflies, abstract shapes, and geometric patterns also work wonderfully as companions to your favorite rhinestones. These combinations allow you to create personalized designs that reflect your style while adding texture and dimension to your manicure.
Glitter and Rhinestones
Nothing says glamour quite like the combination of glitter and rhinestones on your nails. The fine particles of glitter create a shimmering base that complements the bold sparkle of individual rhinestones. Apply a glitter polish as your foundation, then strategically place rhinestones to create focal points that draw attention. This ever-changing duo creates a textural contrast that catches light from every angle, making your nails appear more vibrant and three-dimensional. For maximum impact, try alternating glitter nails with rhinestone-accented ones across your manicure.
Ombre and Rhinestones
Ombre nails offer the perfect canvas for showcasing rhinestones through color gradation. Start with a beautiful color transition, blending from dark to light or between complementary hues. Place rhinestones strategically along the gradient, perhaps concentrating them where colors meet or creating a cascading effect that mirrors the ombre itself. This technique creates a seamless blend where both the color transition and the dimensional quality of the rhinestones work together to create visual movement across your nails.
Rhinestones with Chrome and Metallic Finishes
Chrome and metallic polishes create the perfect high-shine backdrop for rhinestone embellishments. Apply a silver chrome polish as your base and dedicate one accent finger to a full rhinestone treatment for a “disco ball meets heavy metal” effect that’s impossible to ignore. Metallic finishes in gold, rose gold, and bronze also pair exceptionally well with rhinestones, creating a luxurious look that exudes sophistication. The reflective quality of chrome polish amplifies the sparkle of each rhinestone, creating a cohesive design where both elements enhance each other’s brilliance.
Matte Base with Glossy Rhinestone Accents
The contrast between a matte base and glossy rhinestones creates a sophisticated visual tension that elevates any manicure. Apply a matte top coat over your favorite polish color, transforming it into a velvety canvas that allows rhinestones to stand out dramatically. The absence of shine in the background makes each glossy rhinestone appear more brilliant and three-dimensional. This technique works beautifully with subtle nude shades for an understated elegant look, or with bold colors for a more dramatic statement. Even a simple design with a few strategically placed stones becomes striking when set against a matte finish.
Color-Coordinated Rhinestone Nail Ideas for Cohesive Looks

Creating a cohesive rhinestone nail design starts with thoughtful color coordination. When planning your sparkly manicure, selecting colors that work harmoniously together will elevate your nail art from merely pretty to professionally polished. Let’s explore some color strategies that will make your rhinestone nail designs truly shine.
Monochromatic Rhinestone Color Schemes
Monochromatic designs offer sophisticated elegance that’s both trendy and timeless. Using various shades of a single color creates depth while maintaining a unified look that’s perfect for both casual and formal occasions. Start with a base coat in your chosen color, then add rhinestones in lighter and darker variations of the same hue. For instance, a light pastel pink base paired with medium rose and deep magenta rhinestones creates a stunning dimensional effect while staying within the same color family.
Texture plays a crucial role in monochromatic designs. Combining glossy and matte finishes in the same color palette adds visual interest without disrupting your color scheme. Try applying a glossy sheer polish as your base, then arrange matte-finish rhinestones in the same color for a luxurious textural contrast. This technique works particularly well with neutral tones like beige and gray, creating subtle elegance that catches the light in unexpected ways.
Complementary Color Rhinestone Arrangements
Complementary colors sit opposite each other on the color wheel and create striking contrasts that make rhinestones truly pop. Pairing blue with orange or red with green produces eye-catching designs that draw attention to your nail art. Place rhinestones in your complementary color against a solid base for maximum impact—imagine emerald rhinestones against a soft pink background or sapphire stones on a peachy orange base.
Classic pairings like pink and black never fail to create sophisticated nail looks. Black polish provides a dramatic backdrop for pink rhinestones, especially when you add raised texture elements surrounding the stones. For a more ever-changing approach, create ombre nails with complementary colors such as pink transitioning to blue, then add iridescent rhinestones that shift colors in different lighting. This gradient effect adds movement and dimension to your manicure.
Themed designs offer another way to incorporate complementary colors effectively. Wedding manicures might feature burgundy, mauve, and platinum colors with strategically placed rhinestones for elegant sophistication. Halloween designs can showcase neon colors with contrasting rhinestones for a festive vibe that’s perfectly seasonal. The key to success with complementary colors is moderation—allow one color to dominate while using the other as an accent to avoid overwhelming the design.
Professional Tips for Long-Lasting Rhinestone Nail Applications

Creating a dazzling rhinestone manicure isn’t just about the design—it’s about making sure those sparkly gems stay in place. We’ve gathered expert techniques to help your rhinestone nail art remain beautiful and intact for weeks.
Best Adhesives for Securing Rhinestones
Crystal Fix Nail Glue stands out as the top choice for attaching rhinestones to your nails. Before applying any adhesive, ensure your nails are completely clean and your gel polish is fully cured to create the perfect foundation. Apply just a tiny drop of glue exactly where you want to place each rhinestone—precision is key here. Using a specialized pick-up tool, carefully position the rhinestone onto the glue spot and press down with gentle pressure to secure it properly. Less is more when it comes to adhesive application; excessive glue can spill around the stone and diminish the overall appearance of your design. For optimal results, allow the adhesive to cure according to the exact instructions provided with your chosen product.
Protective Top Coat Techniques for Durability
Sealing your rhinestone design properly makes all the difference in extending its lifespan. Apply a quality top coat around the edges of each rhinestone to create a protective barrier without covering the actual stones. This technique helps lock the rhinestones in place while preserving their brilliant sparkle. For additional durability, wear protective gloves during cleaning activities to shield your nail art from harsh chemicals. Perform regular checks for any loosening stones and quickly reattach them with a small amount of nail glue to prevent losing them. Avoid using your decorated nails as tools for opening cans or scratching surfaces, as this common habit can easily dislodge your carefully placed rhinestones. These preventative measures will significantly extend the life of your rhinestone manicure, keeping your nails looking salon-fresh for longer periods.
Essential Tools and Supplies for Creating Stunning Rhinestone Nails

To achieve those eye-catching rhinestone nail designs, you’ll need to gather the right materials first. Let’s explore the essential tools and supplies that will help you create professional-looking rhinestone nail art at home.
Different Types of Rhinestones for Nail Art
Rhinestones come in various options to match your creative vision and desired effect. Size variations play a crucial role in your design, with smaller stones perfect for intricate patterns and larger ones making bold statements on accent nails. Colors range from vibrant neon shades to soft neutrals like pink and gold, allowing you to either complement or contrast with your base polish. Shape diversity adds dimension to your nail art, with round rhinestones offering a classic look, while teardrops and unique shaped stones create more distinctive designs. When selecting your rhinestones, consider how they’ll work together on your nails—mixing sizes and shapes can create depth and visual interest while maintaining a cohesive appearance.
Application Tools Every Nail Artist Needs
Creating stunning rhinestone nail art requires exact tools for precision and durability. Nail glue, particularly crystal fix formulations, provides the strongest hold and should be applied in tiny drops to prevent messy spillage around your stones. Thin tweezers or a dedicated pick-up tool helps place even the tiniest rhinestones with accuracy onto the designated spots. Quality nail polish components including base coat, gel polish, and top coat establish the foundation and seal your design effectively. Proper nail preparation materials ensure clean surfaces for better adhesion, making your rhinestone application last longer. UV or LED lamps cure both the gel polish and glue, securing the rhinestones firmly in place. Protective gloves shield your hands from harsh chemicals that might compromise your beautiful nail art. For best results, apply a small drop of glue, position the rhinestone with your pick-up tool, press gently, cure according to instructions, and seal the edges with top coat without covering the rhinestone’s sparkly surface.
How to Maintain Your Rhinestone Nail Art for Extended Wear
Rhinestones offer endless possibilities to transform your manicure from simple to spectacular. Whether you prefer minimalist designs for everyday wear or full-coverage glamour for special occasions we’ve explored many ways to incorporate these dazzling gems into your nail art.
Remember to use quality adhesives and proper application techniques to ensure your rhinestones stay secure. Regular maintenance with a gentle top coat refresh can extend the life of your design without compromising its sparkle.
We hope these creative ideas have inspired you to experiment with rhinestones on your next manicure. From seasonal themes to geometric patterns the right rhinestone placement can elevate any nail look while expressing your unique style. Now it’s time to let your creativity shine as bright as your new bejeweled nails!
Frequently Asked Questions
How do I apply rhinestones to my nails?
To apply rhinestones, start with clean, dry nails with polish completely set. Place a small dot of nail glue where you want the rhinestone, then use tweezers to pick up and place the stone. Press gently for a few seconds to secure. Finish with a careful top coat application around (not over) the stones to seal the edges without dulling their shine.
How long do rhinestone nail designs last?
Rhinestone nail designs typically last 1-2 weeks with proper application and care. Using quality nail glue specifically designed for rhinestones and sealing the edges with a top coat will extend longevity. Avoid rough activities that might catch on the stones and apply hand lotion carefully to preserve your design.
What’s the best adhesive for rhinestone nail art?
Crystal Fix Nail Glue is highly recommended for rhinestone applications. It provides a strong bond while remaining flexible enough to prevent stones from popping off. Gel top coat can also work for smaller rhinestones when cured under a UV or LED lamp. Always choose adhesives specifically formulated for nail art to ensure safety and durability.
Can beginners create rhinestone nail art at home?
Absolutely! Beginners can start with simple designs like accent nails or minimal stone placement. Use tweezers and a dotting tool to precisely place rhinestones. Begin with larger stones as they’re easier to handle. Practice on press-on nails first if you’re nervous. As your confidence grows, you can progress to more elaborate designs.
What are some easy rhinestone designs for everyday wear?
Minimalist designs work best for everyday wear. Try a single rhinestone at the base of each nail, a delicate line down the center, or tiny stones along the cuticle area. French tips with subtle rhinestone accents maintain elegance while being practical. Pair neutral polish colors with clear or matching stones for a sophisticated look that won’t interfere with daily activities.
How do I choose the right size rhinestones for nail art?
For beginners or subtle designs, start with SS3-SS6 (1.3-2.0mm) stones as they’re versatile and easy to place. Larger stones (SS10-SS16) work well as accent pieces or focal points. Mix sizes for dimension in complex designs. Consider your nail size—smaller nails look best with smaller stones. Match rhinestone size to the intricacy of your design for balanced results.
Can I apply a top coat over rhinestones?
You should apply top coat around the rhinestones, not directly over them. Coating over stones will dull their sparkle and diminish the 3D effect. Instead, carefully seal the edges of each stone with a thin layer of top coat to secure placement. If you must cover stones, use a gel top coat that remains clear and glossy after curing.
What tools do I need for creating rhinestone nail art?
Essential tools include: nail glue or gel top coat, precision tweezers for stone placement, a wax pencil or dotting tool for picking up stones, a small dish to hold rhinestones, a clean brush for removing excess stones, and various sizes and colors of rhinestones. A UV or LED lamp is necessary if using gel methods for application.
How do I prevent rhinestones from falling off?
Ensure your nail surface is clean and oil-free before application. Use proper nail-specific adhesive and allow sufficient drying time. Apply stones after polish is completely dry. Seal the edges with top coat without covering the stones. Avoid excessive hand-washing, hot water, and harsh chemicals. For special occasions, apply stones the day of the event for maximum security.
How can I incorporate rhinestones into seasonal nail designs?
For summer, pair rhinestones with bright colors and tropical designs. Fall calls for stones in amber, burgundy, and gold tones. Winter designs might feature snowflake patterns with crystal rhinestones. Spring works well with pastel bases and floral rhinestone arrangements. Holiday-specific designs can incorporate themed colors and patterns, like red and green for Christmas or orange and black for Halloween.